Setting Up
As we work through these labs at various times you will be creating resources with unique names and copying, modifying and pasting templates and code snippets.
To keep track of these it is highly advisable to create a document on your local PC to act as a scratchpad to hold these pieces of data to copy and paste to the ssh terminal and the AWS console.
If you have a simple note taking app this will work well, Visual Studio Code or VS Codium are both excellent for preserve code unmodified (The two products are almost identical but VS Code may be slightly faster to be updated, it contains more telemetry to report usage statistics and VS Codium is licenced under a more Open Source licence, both will work very well for courses on this site).
Microsoft Word is also useful but please be aware that by default Word can modify the characters such as double quotes in quotes strings, this is hard to spot in copy and paste but can break config files and Python scripts. If you are using Word, search for the instructions for your version on how to turn this off.
We will also be creating architecture diagrams using the AWS architecture icon set, this can be downloaded from https://aws.amazon.com/architecture/icons/.
Under the "Get Started" section you can download the icons for Powerpoint or if you wish to use another tool a wide range are listed.
Finally you will need a ssh (secure shell) client. There are detailed instruction on configuring these for Macs, Linux and Windows later in this document.
Conventions for Naming
Where we are naming and tagging items, I suggest we use what seems to be the usual AWS convention which is to keep all names lower case and use a standard hyphen "-" instead of spaces.
All the courses on this site are templates which can be easily customised. For this course we are naming all our resources with an "intro-course" tag but this could be easily modifed to your company or organisation.
In general you are safe to copy the exact name for resources suggested in the documentation e.g. "intro-course-vpc". However, there will be some areas you will need to create a customised name and these are highlighted.
Sometimes you will need to copy and paste exact and unique values from the console or from a terminal session, this will be highlighted in the lab notes.
Setting up the AWS Console
Before we begin we will set up the basics of the AWS console for enhanced security and to make the later stages of the lab easier to work through.
Every standalone AWS account is created with a "root" user which, like the root user in Unix, has access to every AWS service without applying any access control restrictions. While this account is useful as a last resort, it is always best practice to create specific users and groups with more restricted permissions to manage the environment.
If you have already configured your AWS account and linked it to this platform then you can skip this step.
In the steps below we carry out three steps
- Create a personal login user, this will be an account associated with you rather than the root user which is associated with the AWS account
- Create a group which we will add our user to.
- Attach Identity and Access Management (IAM) policies to the group.
In practice you can just associate IAM policies with a user and miss out the group stage completely. But by using groups it makes a multiuser environment far easier to manage and allows us to have groups for specific purposes which users can then be associated with.
One security practice is to have groups which have permissions but by default have no attached users. When a change is needed in a production environment a user (or process) is made a member of the group for the duration of the change and then the group membership is removed. This means that even if a user credentials and login may be compromised, their account would still have no permissions to change the running application unless they could also be added to a group (we will explore this further in the cloud security courses).
Creating the first IAM User
Go to the AWS Console at https://aws.amazon.com/, click on sign in on the top right.
Sign in with your root credentials (email) and password, as provided at the start of the course.
The process may require you to change your password, in which case change it and record it somewhere safe and accessible, this could be on your temporary data scratchpad.
You may also be prompted to create a MFA (Multi Factor Authentication) token association. Using an App on your phone like Google Authenticator or Microsoft Authenticator scan the QR code and create an MFA association.
Create a Group
In the top search bar, Search for IAM then go to "User Groups" in the left hand menubar
Select "Create group", which is a button in the top right of the console.
Call it "intro-course-cloudandlight"
We don't need to add any users at this stage
Attach a policy, search for and add "AdminstratorAccess", "ReadOnlyAccess" and "AWSBillingReadOnlyAccess".
Hint
You can search for read only access as a policy in the console.
Note – These Policies actually overlap, but later in the course we could come back and replace the managed Administrator Access with a custom policy limiting us to the services we need to use.
Click on "Create user group" at the bottom of the page to create the group
Create your Login User
In the IAM console go to "Users" in the left hand menu
Create a user, in the example below it's "cloudsandlight" but feel free to choose a name which you find easy to work with.
Check the box "Provide user access to the IAM Console", then check "I want to create an IAM User".
Enter a password, make a note of it (perhaps in the temp data scratchpad), uncheck "change at login".
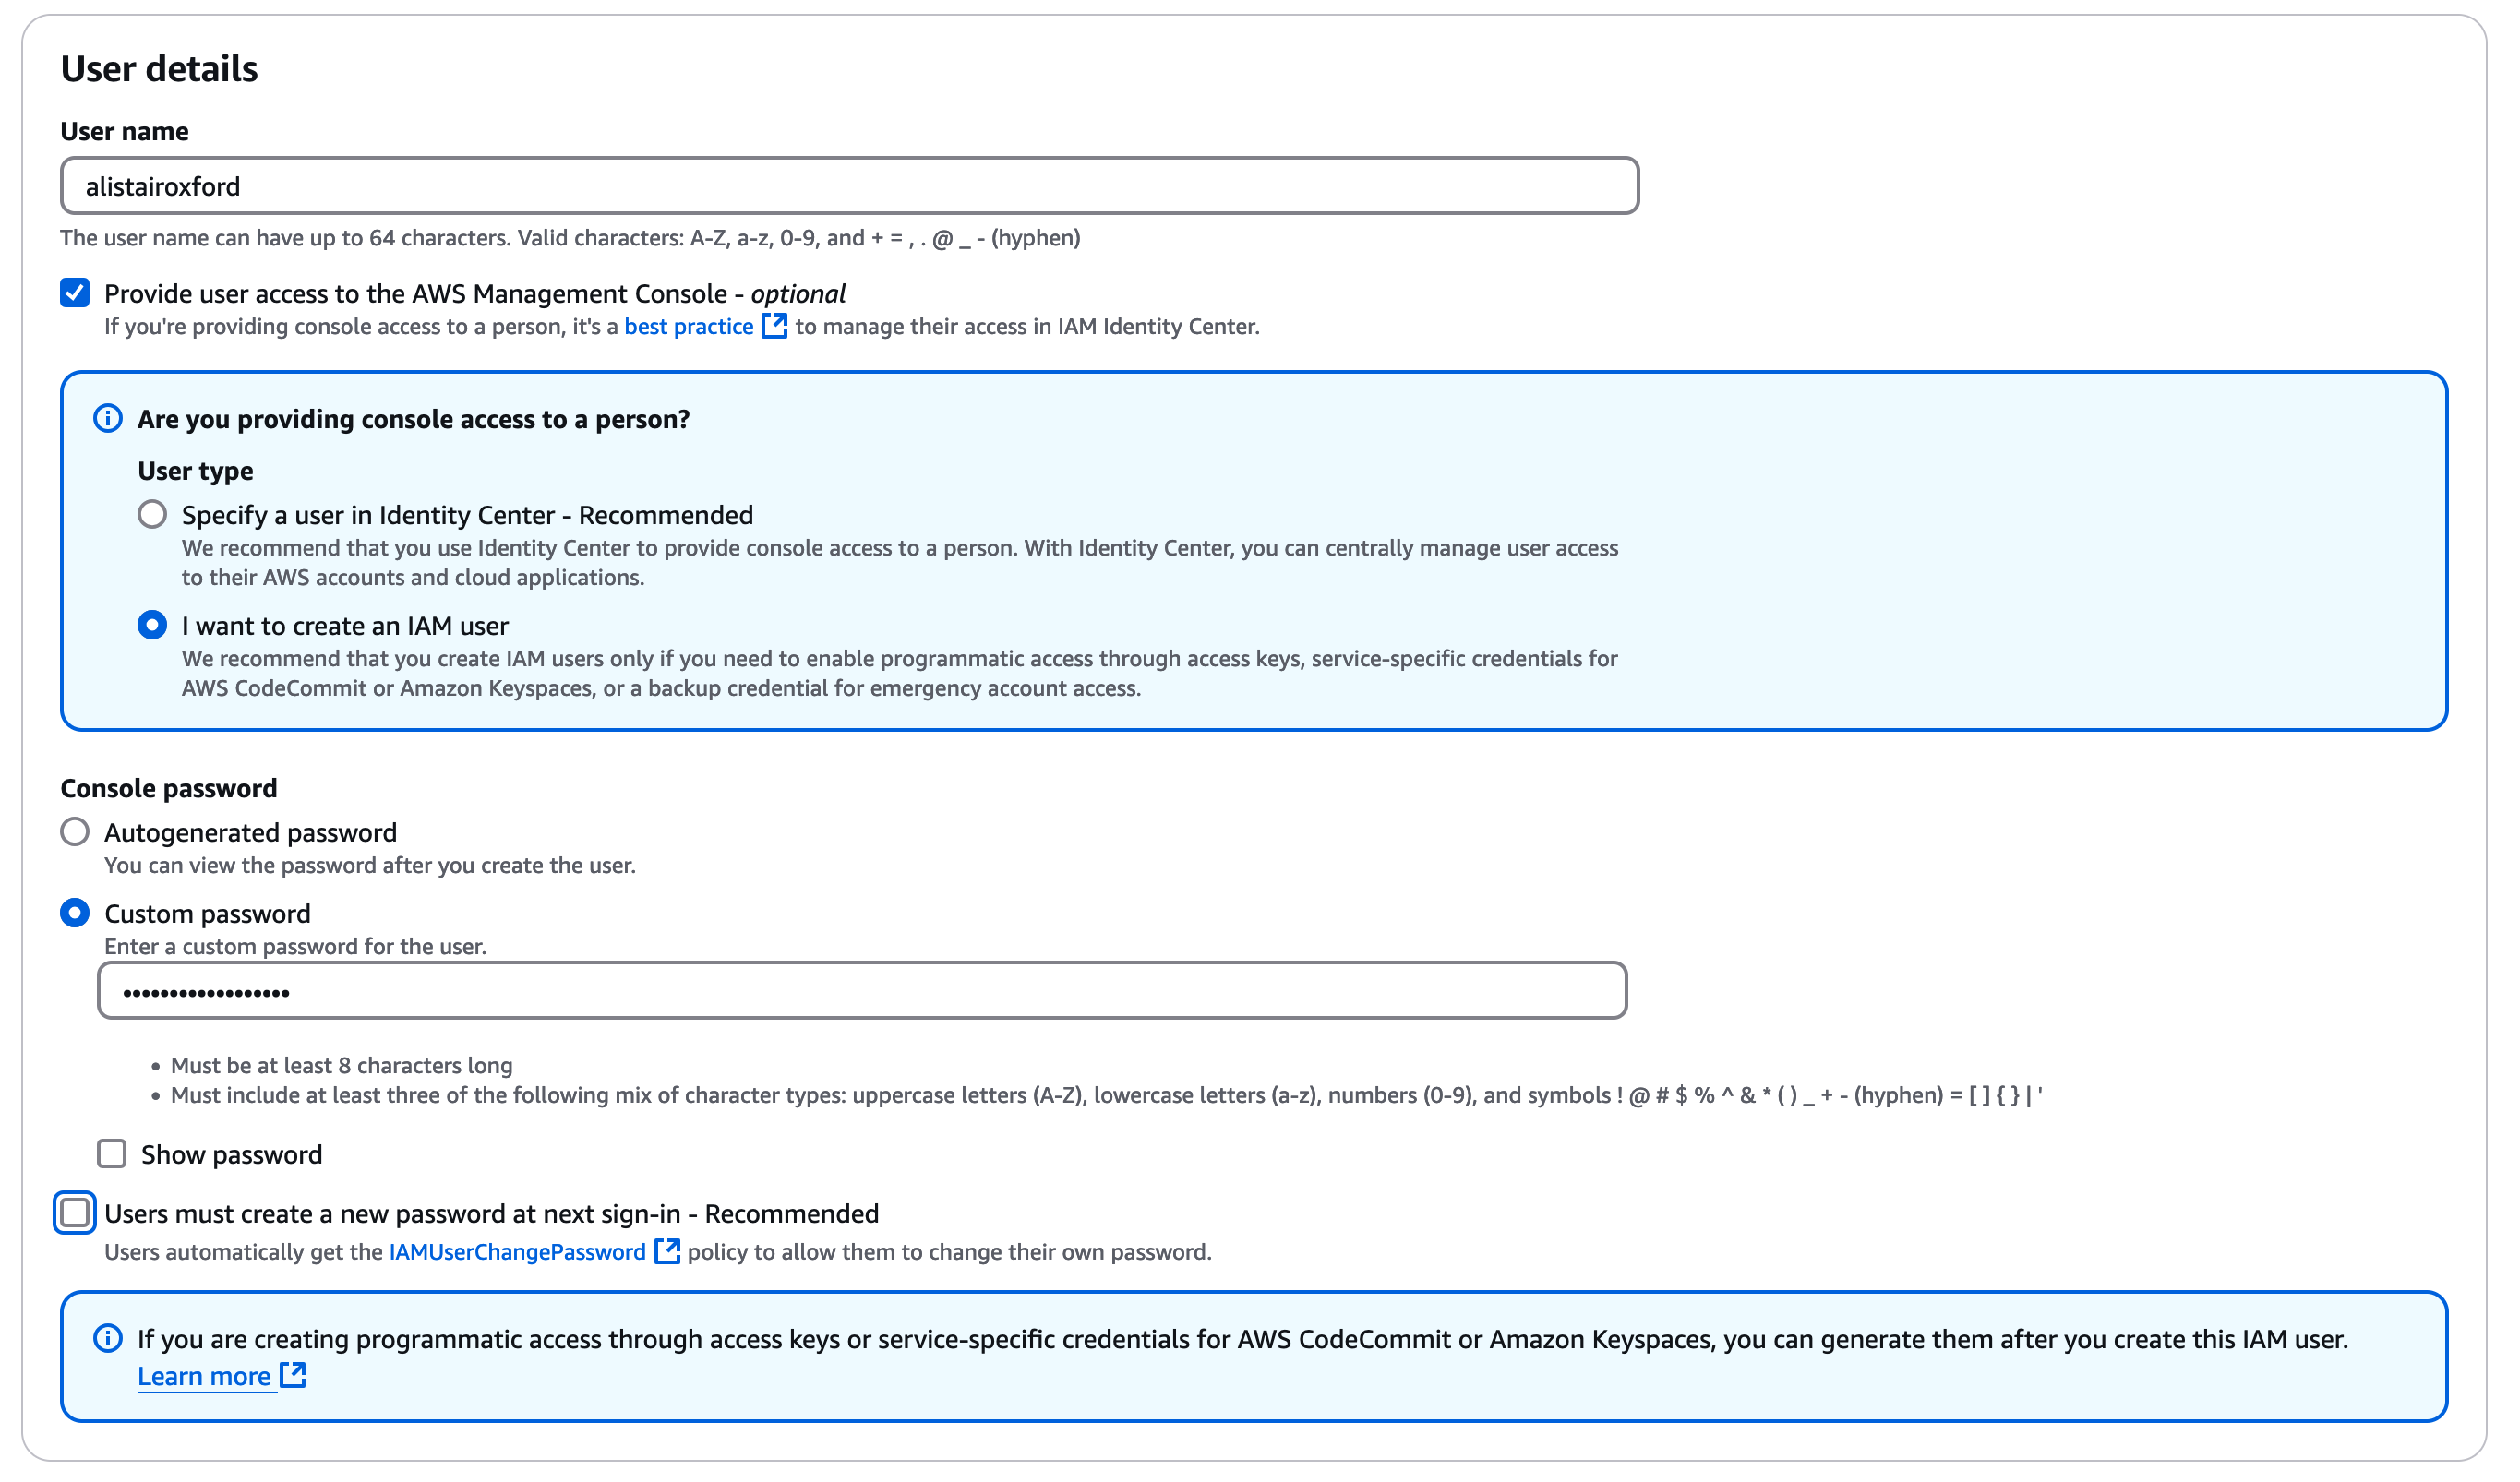
Click "Next" then add the user to the group you created earlier "intro-course-cloudsandlight". Ignore "Set permissions boundary"
Click "Next" to review details, feel free to add a descriptive tag, then "Create User"
Create a Custom URL for your console
This step isn't essential but is useful for using the console frequently.
In the AWS Console, return to the IAM dashboard
In the top right you should see AWS Account - Account Alias
Click Edit under account alias. Choose a new alias for the console, it could be "(your name)-cloudsandlight" for example.
Once you save and return to the IAM console you should see a new console URL which looks like
https://(your name)-cloudsandlight.signin.aws.amazon.com/console
Copy this URL and save it to a bookmark for your AWS console, we will be using this URL to login from now on.
Once this is done we can log out from the console and root account
Logging in as the IAM User
Go to the URL you specified e.g.
https://(your name))-cloudsandlight.signin.aws.amazon.com/console
Login with the user name and password you just created
You should now be in the console as before. However, if you lock yourself out of this account or a specific service you have the root account to fall back on.
In general, you never need the root account. But when we look at S3 bucket permissions later in the course, it is possible to accidentally create permission which lock your own account out of an S3 bucket access. In this case its useful to have the root account to fix this.
Customising the Console
To make the console easier to use you can add favourites to the console toolbar, again this isn’t essential but just makes navigation a little easier.
Go to the services menu item and find each of the following, and click the star next to its menu item
- Networking and Content Delivery – VPC
- Compute – EC2
- Storage – S3
- Storage – EFS
- Security, Identity and Compliance – IAM
- Management & Governance – CloudTrail
- Management & Governance – CloudWatch
They should now appear as icons at the top of the console
Creating a VPC Network
When AWS launched their EC2 (Elastic Compute Cloud) service in 2007 when you launched a virtual machine it was stood up in an AWS data centre and given a unique Internet routable IP address.
As AWS has grown this approach can’t scale, AWS runs in excess of 80 million physical servers which in turn probably host over one billion virtual machines. This would represent more than 25% of the available IP V4 addresses.
Therefore, AWS introduced Virtual Private Cloud (VPC) networking. This allows you to use your own range of IP addresses in a private network and add endpoints, gateways and virtual network appliances to control communication between your EC2 instances and other networks and other AWS services.
Structure of VPC Networks
AWS has a concept of regions and availability zones. Regions are geographic areas which host three or more availability zones(*). Availability zones are clusters of one or more physical data centres hosting services. Each availability zone has separate power service and redundant network connections to the other AZs
* Occasionally an AWS region is launched with fewer than three availability zones available to end users - See AWS regions and Availability Zones for the current breakdown.
Note
While Azure and GCP have introduced the concept of availability zones they may differ in their approach and implementation to AWS. Networking and network routing is one of the key differentiators between the major cloud providers. The general principles described below will work with any cloud provider, but you should consult their network and resilience documentation if applying this to Azure or GCP.
When we create a VPC we start by defining the range of IP addresses we will use. This will represent the entire range of IPs we will use in the region. But before we can use these addresses we need to create subnets, these contain the subset of IP addresses we will use in a specific availability zone.
We will describe the subnets using the standard CIDR (Classless Inter-Domain Routing) notation.
For a description see - https://aws.amazon.com/what-is/cidr/
The networks we will create are as follows;
| Scope | Name | Range | Available IPs |
| Ireland Region | intro-course-vpc | 10.0.0.0/16 | circa 65,536 |
| AZ A | intro-course-subnet-A1 | 10.0.10.0/24 | 250 |
| AZ A | intro-course-subnet-A2 | 10.0.20.0/24 | 250 |
| AZ B | intro-course-subnet-B1 | 10.0.11.0/24 | 250 |
| AZ B | intro-course-subnet-B2 | 10.0.21.0/24 | 250 |
| AZ C | intro-course-subnet-C1 | 10.0.12.0/24 | 250 |
| AZ C | intro-course-subnet-C2 | 10.0.22.0/24 | 250 |
| AZ A | introMgmtNet | 10.0.0.0/28 | 10 |
Note
When a subnet is created in AWS the first 5 IP addresses and the highest IP address in the range are reserved for network and AWS service use, so this reduces the number available to your use. This is important to remember if you are creating small subnets.
We are only using IP V4 addresses throughout this course. If you are deploying a new application in the cloud today which doesn’t need to route to an existing IP V4 network I would strongly recommend looking at IP V6 but describing how this works is beyond the scope of this course.
Checking for a Default VPC
Go to the console homepage and search for and select "VPC".
In the top right of the console, you should see the AWS region you are using, use the dropdown to select the region you are chose to use for the labs when you set your AWS access up. If you in doubt click on the menu with your user name in the top right of this page and select "User Profile", your preferred AWS region is listed there. If you didn't specify a region and are just using AWS without linking your account feel free to use any region, but the documentation assumes EU-West-2 (London), so just adjust the references in the course to your region.
You should see a list of all the AWS resources you have provisioned, at this point they should all be zero. You may see that there is already a VPC in your region, in the left hand menu select "Your VPCs". If there is a VPC listed with a name of "-" and the column "Default VPC" is listed as "Yes" this is a default VPC resource created by AWS when the account is created. You can select it using the check box on the left of the Name field, then using the "Actions" menu select "Delete VPC"
You will see a warning box to show you are deleting the VPC and the three associated subnets. Select the checkbox which states that "I acknowledge that I want to delete my default VPC." and type "delete default vpc" in the text box. Finally click "Delete" to delete the resource.
If you go back to "Your VPCs" in the left hand menu you should see the message "No VPCs found in this Region", this is perfect as we want to create a network structure entirely of our design with our naming structure.

Creating the VPC
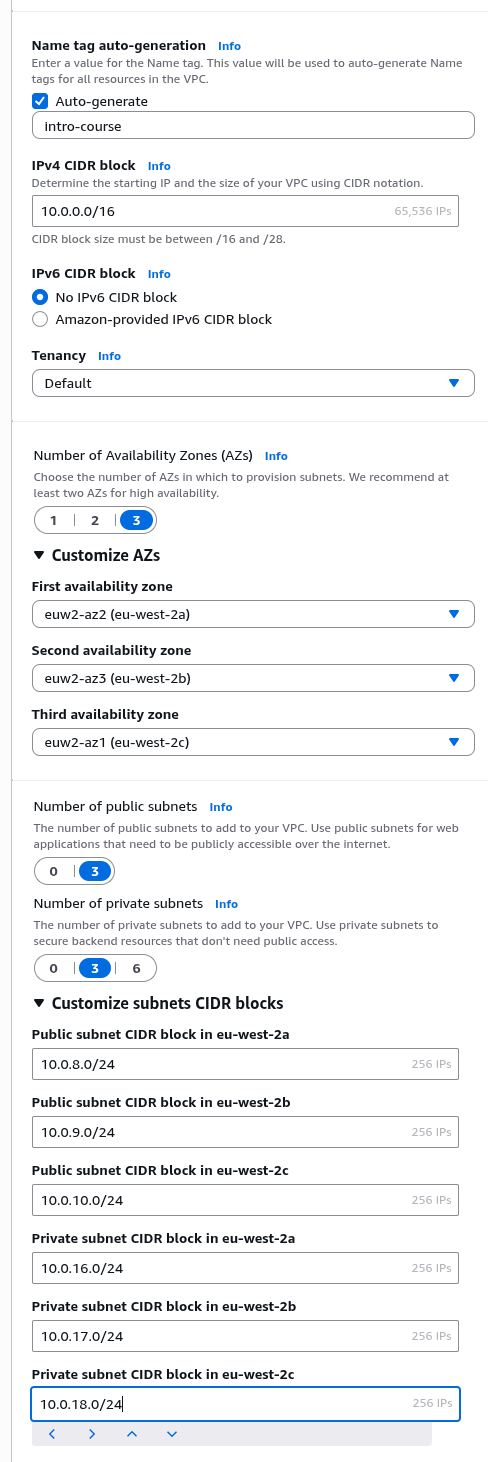
Select the orange "Create VPC" in the top left.
Under "VPC settings" select "VPC and more"
For "Name tag auto-generation" enter "intro-course"
For the IP V4 CIDR block set it to ("10.0.0.0/16"), select ("No IP V6 CIDR block")
For Tenancy leave as "Default"
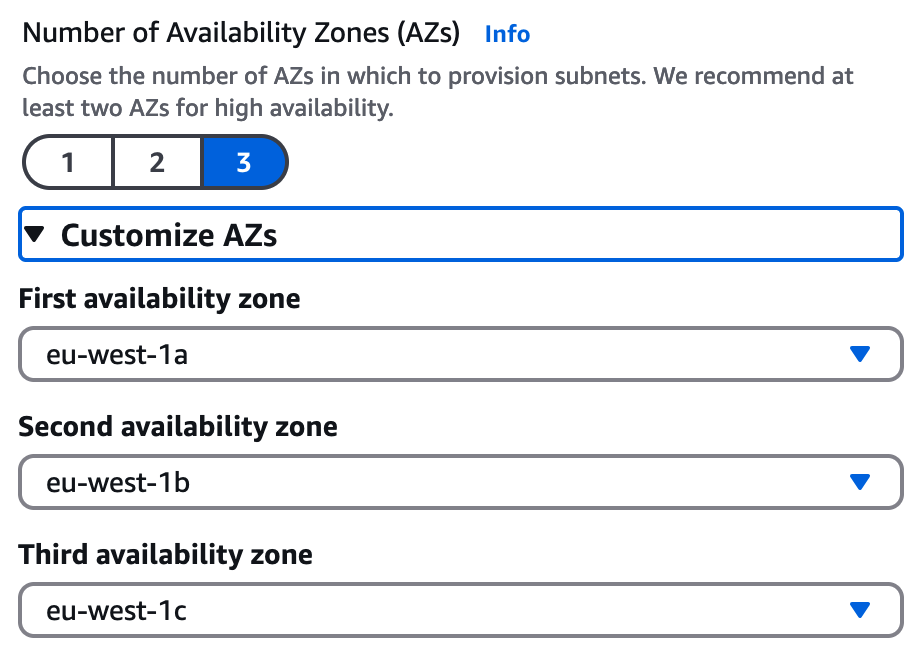
For "Number of Availability Zones (AZs)" select "3".
Click on "Customize AZs" and just ensure thatthe availability zones are set according to the AWS region you are using, so for the region "eu-west-2" the First Availability zone will end in a e.g. "(eu-west-2a)", the Second Availability Zone will end in b e.g. "(eu-west-1b)" and the Third Availability zone to c e.g. "(eu-west-1c)" (as shown below). Note there are no technical reason for this, its just to ensure standardisation in the lab instructions later so AZs and network ranges match. For the rest of the documentation we will refer to Availability Zones as AZ - A, AZ B and AZ C.
For "Number of public subnets" choose "3" and for "Number of private subnets" also choose "3"
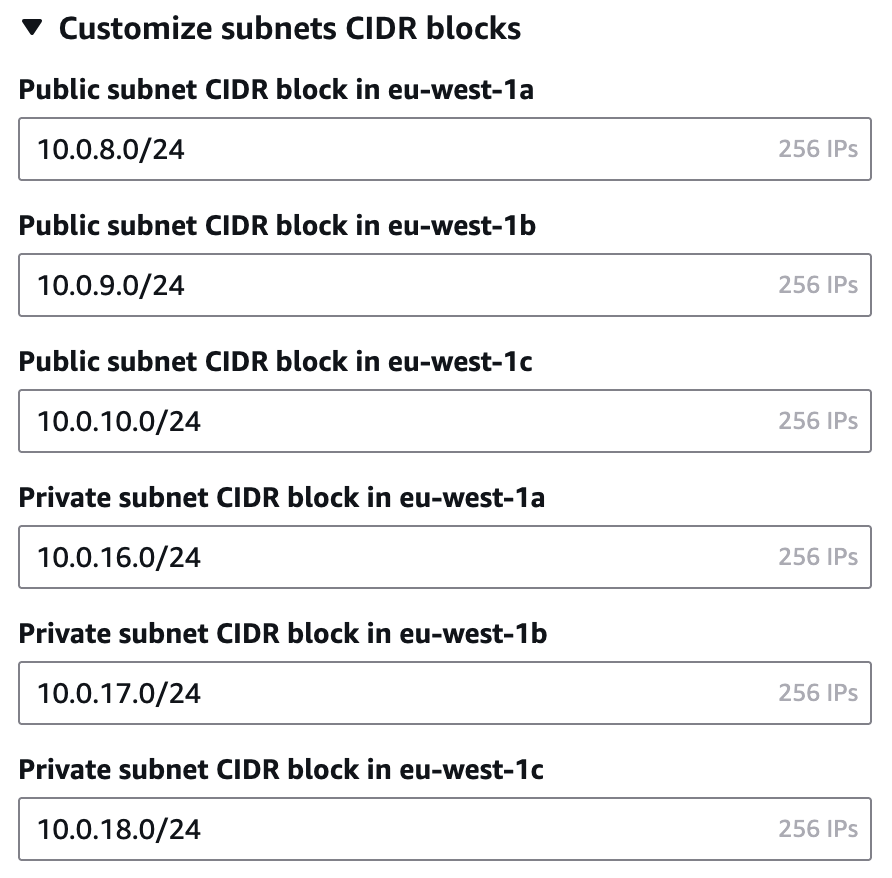
Click "Customize subnets CIDR blocks" and enter IP addresses as follows;
Public Subnets

AZ A - 10.0.8.0/24
AZ B - 10.0.9.0/24
AZ C - 10.0.10.0/24

Private Subnets

AZ A - 10.0.16.0/24
AZ B - 10.0.17.0/24
AZ C - 10.0.18.0/24
It should look like this
For NAT gateways select "None", for "VPC Endpoints" select "S3 Gateway".
A NAT gateway allows instances which might not have a route to another network to open connections directly to another network such as the Internet, we don't need this so security best practice is to not enable it (it also has an hourly cost, so there is a cost benefit here). An S3 gateway allows compute instances to connect directly to AWS's S3 storage service and we will use this in future courses.
Finally enable both "DNS hostnames" and "DNS resolution"
We do not need to create any additional tags.
For review your form should look like the below;
Click "Create VPC"
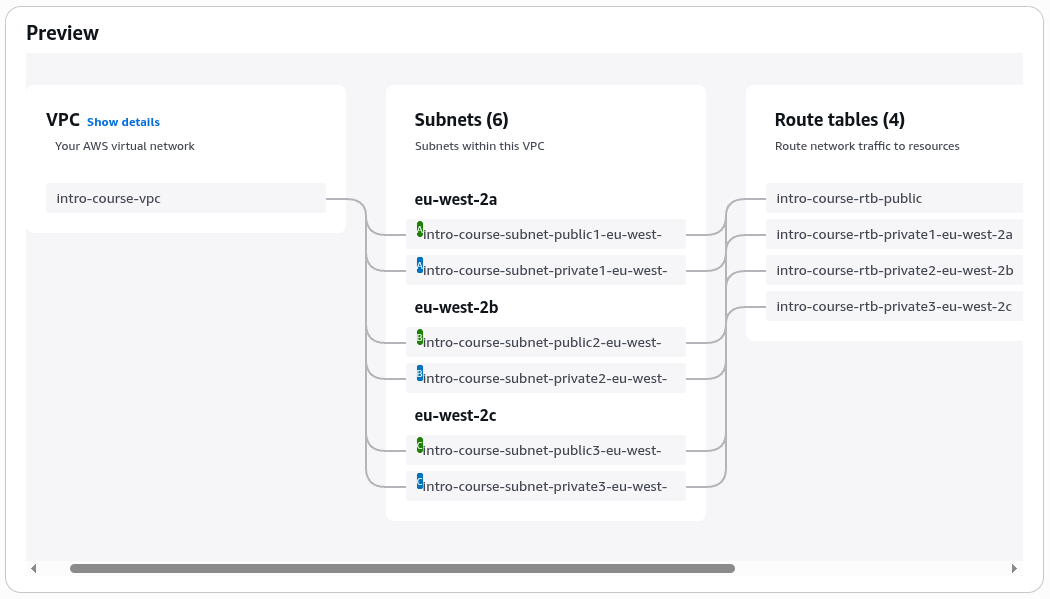
You should now see the console run through a 20 step checklist as it creates the resources in about 5 seconds!
All being well you should see a resource map like the below. Take a few minutes to click through and explore the resources.
Adding the management subnet
There are a number of different approaches to managing instances.
In a real production environment the goal is often to eliminate all interactive logins to EC2 instances. Rather the instances are built end to end with a code build pipeline (e.g. AWS Code Build or Jenkins) and deployed using a tool such as Terraform or AWS CloudFormation. In this model, configuration changes made either once at boot time or pulled from an external store. The status of instances is then captured using logging and monitoring. If there is an issue with instances or they need a updated software build they are simply destroyed and replaced with new builds from the build pipeline.
These are often known as cattle instances, and are often described as immutable although in practice immutable operating systems on read only filesystems are very hard to build (see the Fedora Silverblue project for interesting discussions on this - https://fedoraproject.org/atomic-desktops/silverblue/)
However, we are running a test and development environment, so we will be making changes to our development machines. The approach we will take is to create a separate management network (in our case a small subnet with the IP address range 10.0.0.0/28) which will host a bastion host. This instance will be the only thing which we can interactively log into from the Internet and will then be used to make onward calls to our test EC2 instances. As with any architectural choice there are advantages and disadvantages to using a bastion host but it will be secure enough for our short lived test environment with no confidential data.
Adding a subnet
In the VPC Console, in the left hand menu select "Subnets" to see a list of subnets in the console. Note if recently deleted your default VPC you may see the recently deleted subnets are still in the list. If this is the case click the refresh button to the left of the "Actions" menu to refresh the list.
To create a new subnet, select the "Create subnet" button in the top right
For VPC select our "(intro-course-vpc)" subnet.
For subnet name use "intro-course-management"
Select Availability Zone A, e.g. for eu-west-2 this will be listed as "Europe (London) /euw2-az2 (eu-west-2a)", as long as it ends in "a" it's correct.
For the "IPv4 VPC CIDR block" select "10.0.0.0/16"
For the "IPv4 subnet VPC CIDR block" type "10.0.0.0/28" (this input is a little confusing, you have to type over the selected default)
It should have a default tag selected for the name, this can be left unedited.
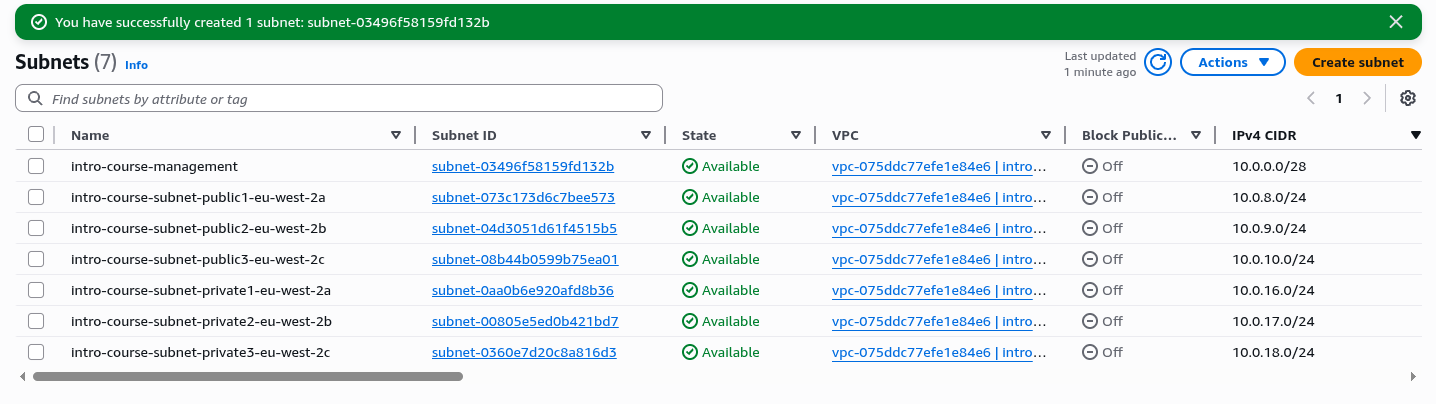
Click the orange "Create subnet" Button.
You should now see your entire list of subnets looks like the following
This has created a new subnet but at present we haven't configured traffic routing, which was done by the VPC creation wizard for the other subnets.
Select the "intro-course-management" in the Subnets list, by checking the check box next to it in the list
Click on "Route Table" in the tabbed view below.
Click on "Edit route table association" button
From the Drop Down List find the entry which ends "….(intro-course-rtb-public)"
This should give you two entries like below, if it doesn't try the other drop down options
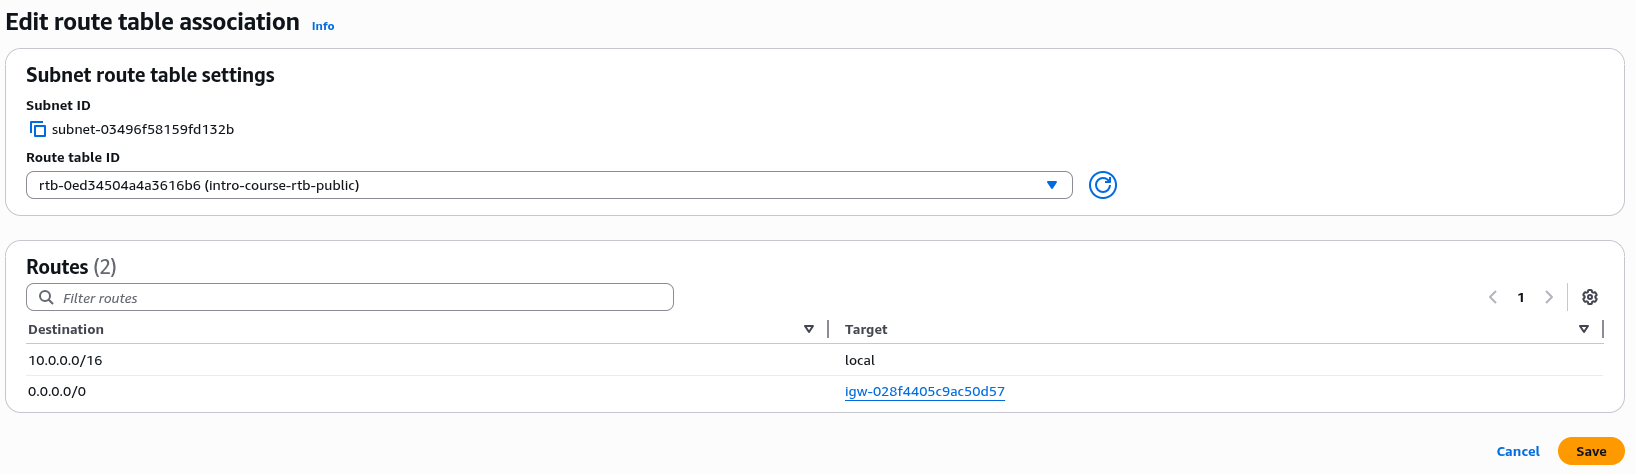
Click "Save" and Check the changes have been applied to the management subnet.
This allows any traffic from this subnet to be routed to any other part of the VPC (anything in the range 10.0.0.0/16) and any other traffic to be routed to the Internet Gateway. Security groups may block this traffic but the traffic router will still direct it between these networks.
This concludes our initial network infrastructure setup for the lab work
Network Testing
Clicking the button below will test your work so far by connecting to your AWS account and testing the VPC setup, the subnets and the networking routing. This gives you the opportunity to check before you complete the next sections.
- Testing VPC Creation
- Testing the Subnet Setup
- Testing Route Table
- Testing Network Security Groups
Code Samples
If you click preview code before selecting "Create VPC" you will see the following commands used to create the VPC
aws ec2 create-vpc --cidr-block "10.0.0.0/16" --instance-tenancy "default" --tag-specifications '{"resourceType":"vpc","tags":[{"key":"Name","value":"intro-course-vpc"}]}'

aws ec2 modify-vpc-attribute --vpc-id "preview-vpc-1234" --enable-dns-hostnames '{"value":true}'

aws ec2 describe-vpcs --vpc-ids "preview-vpc-1234"

aws ec2 create-vpc-endpoint --vpc-id "preview-vpc-1234" --service-name "com.amazonaws.eu-west-1.s3" --tag-specifications '{"resourceType":"vpc-endpoint","tags":[{"key":"Name","value":"intro-course-vpce-s3"}]}'

aws ec2 create-subnet --vpc-id "preview-vpc-1234" --cidr-block "10.0.10.0/24" --availability-zone "eu-west-1a" --tag-specifications '{"resourceType":"subnet","tags":[{"key":"Name","value":"intro-course-subnet-public1-eu-west-1a"}]}'


... (39 more lines)
Costs
Setting up a VPC network with an Internet Gateway and S3 endpoint carry no standing charges. This means you can set them up in your personal account or development environments and not worry about charges. However, this is not true of every AWS network service, services such as NAT gateways and WAF firewalls have an hourly charge and a data transfer charge, so if you are using these it makes sense to add automation around deploying and destroying them.
The ratio of compute, network and storage costs varies across all the major cloud providers, and all have what look like some outliers in terms of costs. While there are always advantages in terms of integration to using the cloud provider native services sometimes it is worth looking at the costs of services like endpoints and NAT gateways and architecting with a cost lens.
Setting Up Security Groups
Every EC2 instance (virtual machine) that you create in AWS will have one or more security groups attached to it to govern which network addresses and ports it can access. Although we are discussing AWS here very similar functionality exists in Azure, GCP and Ali cloud and it is one of the most powerful security features of public cloud.
The AWS console makes it very easy to create security groups when you set an EC2 instance up but I find best practice is to define the network security groups that are relevant to the application architecture diagram and then apply these to instances as they are launched.
Thinking about the application architecture we are going to need the following
- In the management network we are going to stand up a Bastion host for management connections. This will receive inbound SSH connections from the Internet, possibly from a specific IP address if known. It will not allow inbound ssh connections from the web and application server network.
- The Bastion Host will make outbound SSH connections to the servers we are setting up in the networks above.
- The Bastion host will not support any protocols other than ssh
- The servers in our public subnets will respond to HTTP and HTTPS connections from the Internet
- The servers in our public subnets will make outbound HTTP and HTTPS connections to servers in the private subnets
- The servers in the public subnet will allow inbound SSH connections from any hosts in the (small) management network, and nowhere else.
- The servers in the private subnets will allow inbound SSH connections from the management network
- The servers in the private subnets will allow HTTP and HTTPS connections from servers in the public subnets only
- To access S3 all servers will make outbound HTTPS connections to the S3 endpoint.
Creating the Security Groups
Create three security groups as follows;
Go to EC2 in the Console and select Security Groups in the left hand menu.
You will notice there is a default VPC security group. This is created by AWS when you create a VPC and can't be deleted. However, it is always best practice to create custom security groups for each resource or set of resources you manage in AWS, to ensure you gahve complete control over their access.
For each of the three security groups below select "Create security group" in the top right.
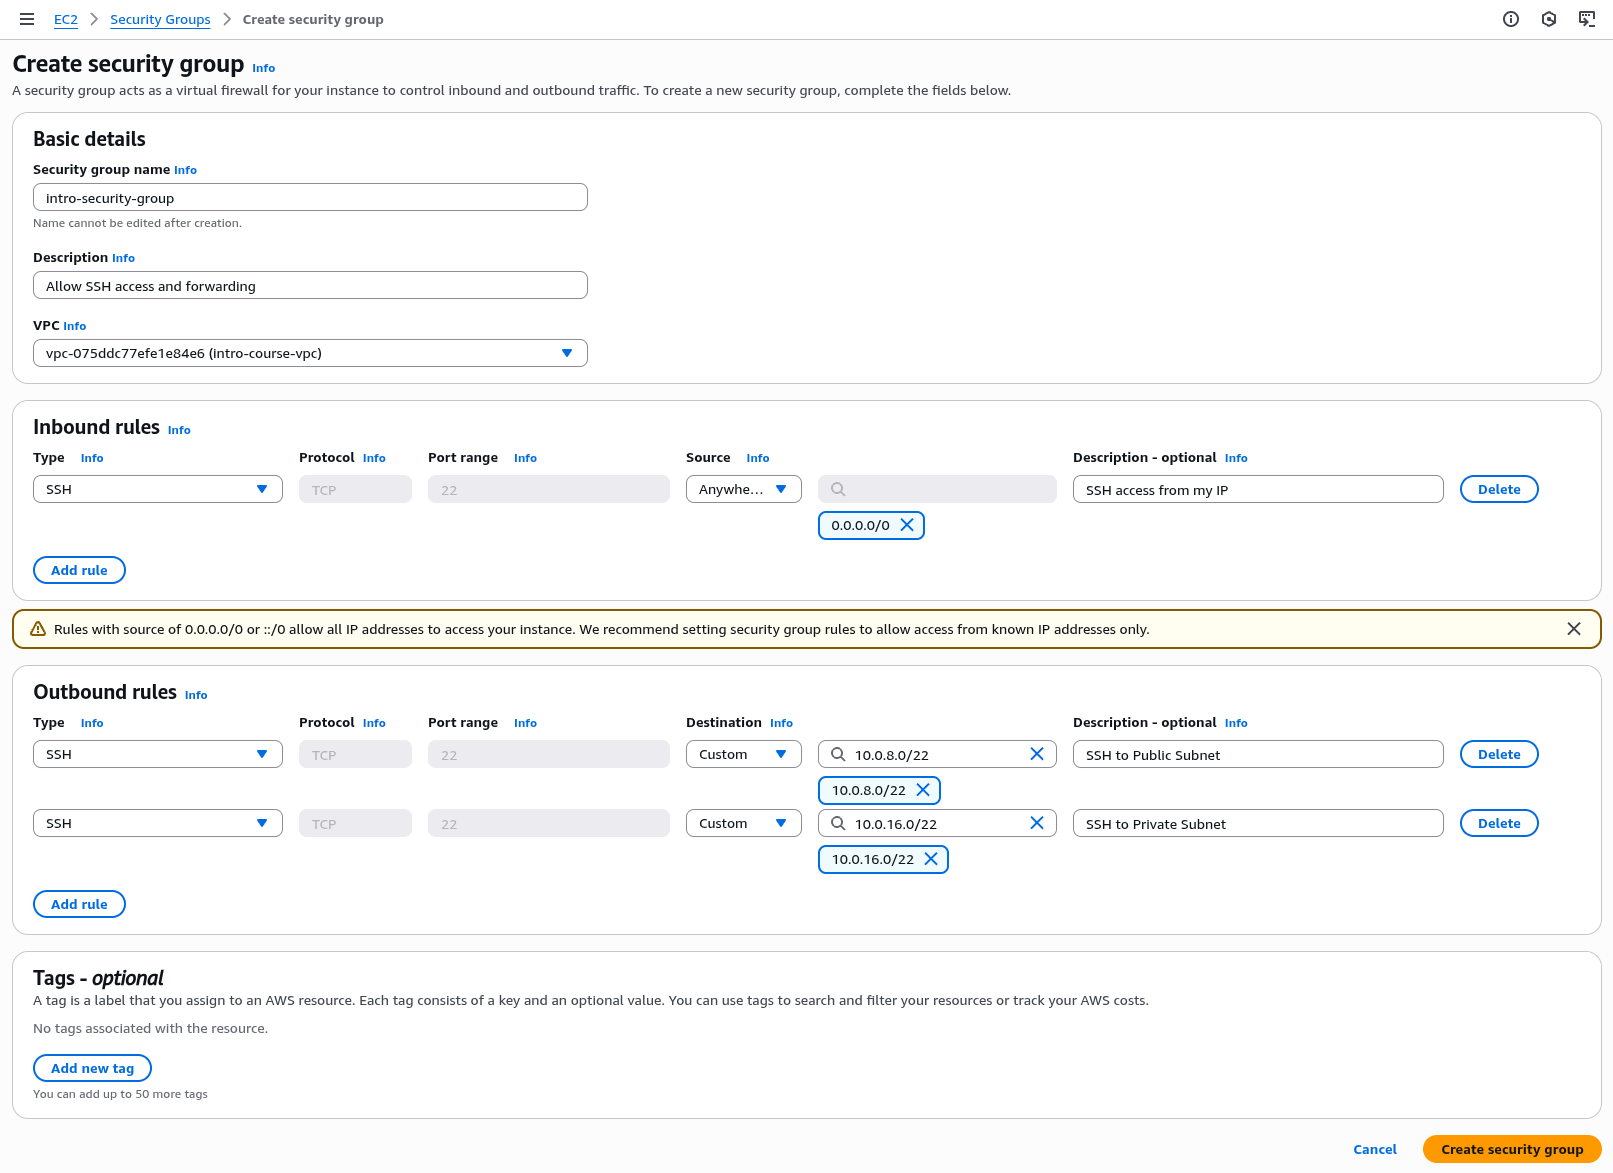
intro-bastion-host
This is the security group which will be attached to the bastion host to allow the forwarding of SSH connections from your laptop or desktop
For the security group name enter "intro-bastion-host"
For description add something along the lines of "Allow ssh access and forwarding"
For VPC choose the VPC labelled "(intro-course-vpc)" in the dropdown
Under "Inbound Rules" select "Add rule"
For the new rule under Type choose "SSH", for Source choose "Anywhere IPV4" for Description enter "SSH access from the Internet"
Note: If you are running these lab exercises from a home PC which has a long lived static IP address or you are using a VPN which gives you a long lived static IP address you can change the "Source" from "Anywhere IPV4" to "My IP address". This will increase security. However, if you find that you can't ssh into your bastion instance later in the course or if you want to come back to the instance later, checking your source IP address matches the security group is a key debugging step. If in doubt our use of SSH key based security makes this safe enough to leave open to the Internet as long as you protect the security of your SSH keys.
If you select "Anywhere-IPv4" you will see a security message which states "Rules with source of 0.0.0.0/0 or ::/0 allow all IP addresses to access your instance. We recommend setting security group rules to allow access from known IP addresses only.". This is good advice but as this is a lab environment with no production data we can rely on security at the instance level for now.
Click "Add Rule"
We will now add outbound rules which limit which instances the bastion host can open connections to.
For the first rule select Type - "SSH", Destination "Custom" and enter "10.0.8.0/22", and for Description enter "SSH to Public Subnet". Click "Add rule" to add the rule.
Note that we have used the CIDR range 10.0.8.0/22 which covers every IP address from 10.0.8.0 to 10.0.11.255, so include each of our three public subnets 10.0.8.0/24, 10.0.9.0/24 and 10.0.11.0/24.
We will then add a second rule to allow SSH access to the Private Subnet
Select Type - "SSH", Destination "Custom" and enter "10.0.16.0/22", and for Description enter "SSH to Private Subnet". Click "Add rule" to add the rule.
Again, this is a CIDR block range which covers all the IP addresses in the private subnets from 10.0.16.0 to 10.0.19.255.
Your rule should now look like the image below, if it looks good click "Create security group" to create the group.
Note that when you list the security groups you will see the Name field is blank but the name we assigned to the Security Group is displayed in the "Security group name" column, this is a slight quirk of AWS that security groups have a different name format which can't be changed after creationin order to prevent name conflicts.
intro-web-server
This security group will be applied to the web server instances to allow the bastion host to access them over SSH and to allow them to serve HTTP / HTTPS traffic from the Internet. There will also be a rule to allow them to make outbound connections to the application servers in the private network
For the security group name enter "intro-web-server"
For description add something along the lines of "Allow inbound ssh and http, outbound http to private network"
For VPC choose the VPC labelled (intro-course-vpc) in the dropdown
Under "Inbound Rules" select "Add rule"
For the new rule under Type choose "HTTP", for Source choose "Anywhere IPV4" for Description enter "HTTP access from the Internet". Click "Add Rule"
For the second rule under Type choose "HTTPS", for Source choose "Anywhere" for Description enter "HTTPS access from the Internet". Click "Add Rule"
For the third rule under Type choose "SSH", for Source choose "Custom" and enter "10.0.0.0/28" for Description enter "SSH access from the Bastion Host". Click "Add Rule"
We will now add outbound rules which limit which instances the web server can open connections to.
For the first rule select Type - "HTTP", Destination "Custom" and enter "10.0.16.0/22", and for Description enter "HTTP to the private network". Click "Add rule" to add the rule.
For the second rule select Type - "HTTPS", Destination "Custom" and enter "10.0.16.0/22", and for Description enter "HTTPS to the private network". Click "Add rule" to add the rule.
The two outbound rules specify that the two webserver instances can only open HTTP and HTTPS connections to the servers in the private networks, no other destinations or protocols are allowed. The AWS default is to leave all outbound connections open. However by implementing this security group we are applying defence in depth best practice. Should the webserver instances be compromised and an attacker manage to get command line access, they can't then open any connections to the Internet preventing a range of possibly bad outcomes.
If this looks correct, click "Create security group" to create the group.
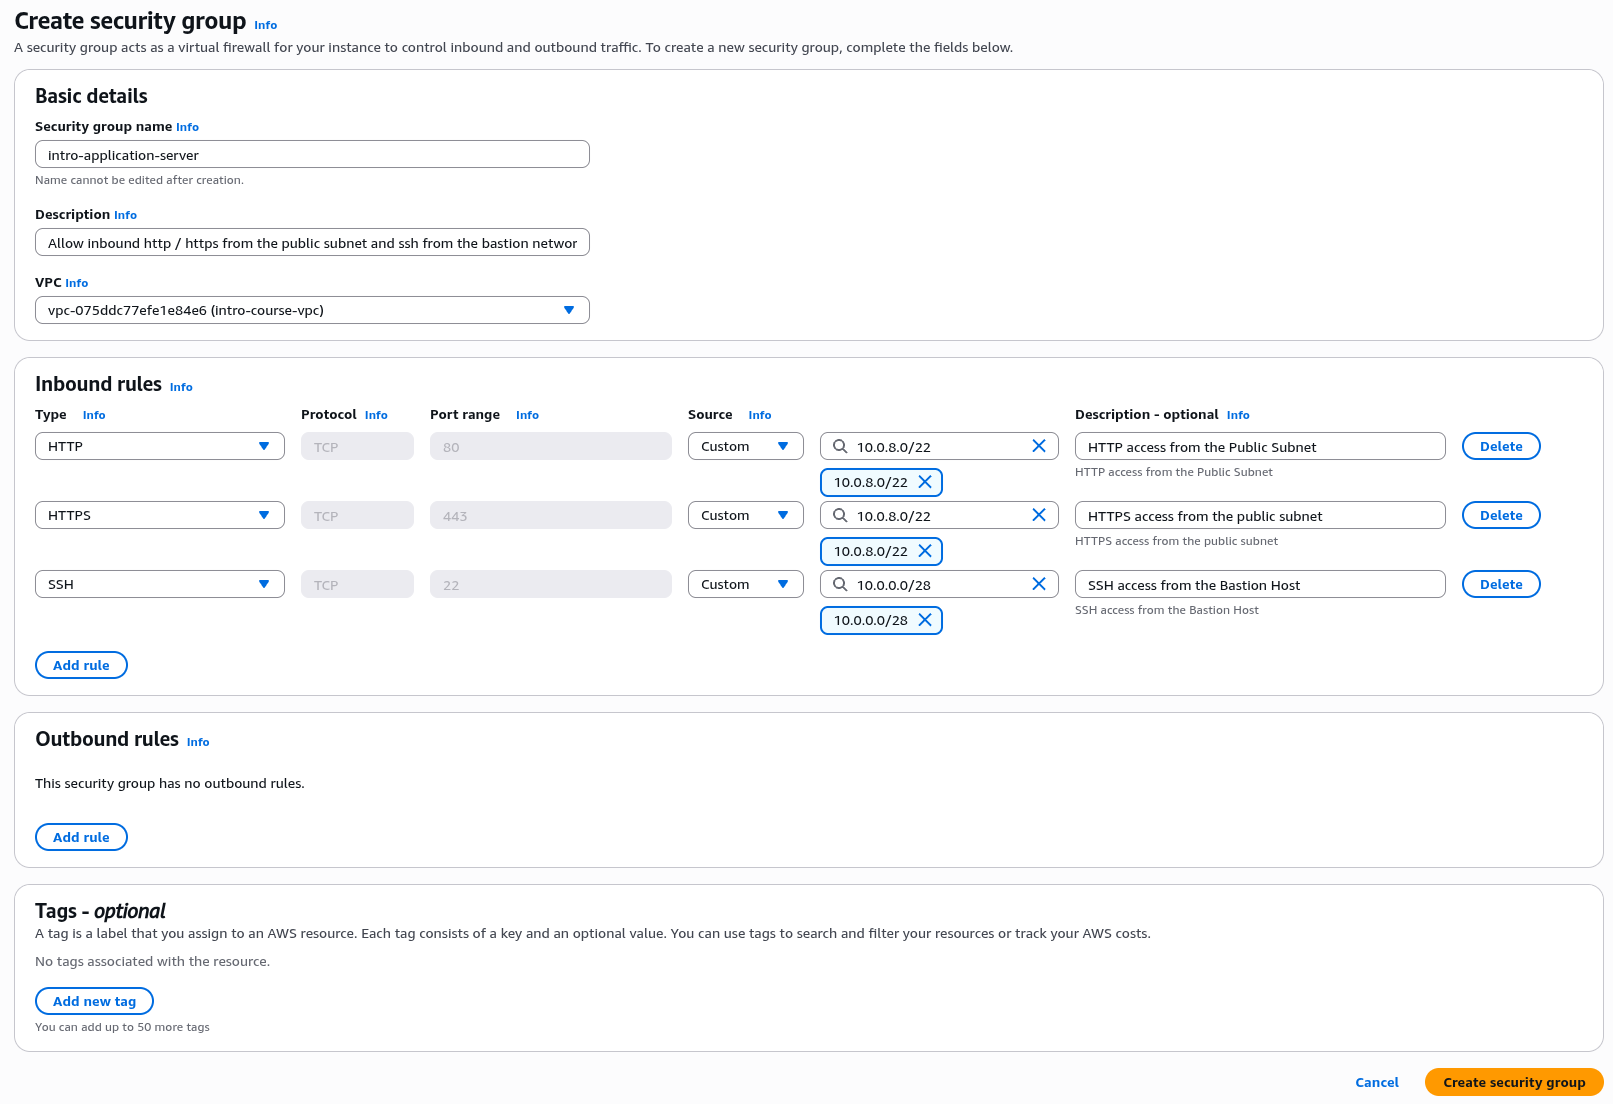
intro-application-server
This security group will be applied to the application server instances to allow them to accept inbound http and https connection from the web servers in the public subnet and ssh from the bastion host. We will delete any outbound connection rules as they won't need to initiate any outbound connections. We will modify this later when we create the RDS database.
For the security group name enter "intro-application-server"
For description add something along the lines of "Allow inbound http / https from the public subnet and ssh from the bastion network"
For VPC choose the VPC labelled "(intro-course-vpc)" in the dropdown
Under "Inbound Rules" select "Add rule"
For the new rule under Type choose "HTTP", for Source choose "Custom" and enter "10.0.8.0/22" for Description enter "HTTP access from the Public Subnet". Click "Add Rule"
For the second rule under Type choose "HTTPS", for Source choose "Custom" and enter "10.0.8.0/22" for Description enter "HTTPS access from the Public Subnet". Click "Add Rule"
For the third rule under Type choose "SSH", for Source choose "Custom" and enter "10.0.0.0/28" for Description enter "SSH access from the Bastion Host". Click "Add Rule"
For the application server we don't want the server to initiate any outbound connections at this stage. So delete the default rule under "Outbound Rules"
Check the details with the image below then click "Create security group", this completes our initial security group setup
Security Group Testing
Clicking the button below will test the security groups you just created. Errors in security groups could lead to services being inaccessible or unintentional exposure of your application to the Internet.
- Testing Bastion Host Security Group
- Testing Web Server Security Group
- Testing Application Server Security Group
Laptop Setup
This section covers the steps needed to set up your laptop to access the AWS compute instances.
Creating SSH Keys
As we will access the AWS Virtual Machines with the Secure Shell Protocol, we need to create SSH keys for each of the server types we will be accessing.
To manage our newly created instances we will be using SSH - The Secure SHell service.
The setup below requires ssh version 9.7 or later. This is supplied by Default in Mac OS x 14 and above and in recent version of Fedora and Ubuntu Linux.
For Windows two different options are described below, one which should work on Windows 11 and most versions of Windows 10, and an emergency alternative for anyone on an older version of Windows.
Configuring Mac / Linux
As the default login user go to your home directory e.g. Users/Alistair
Create a subdirectory for your ssh keys e.g. "mkdir ./keys"
Check to see if there is a ".ssh" subdirectory using "ls -a", if not create it with "mkdir .ssh"
In the AWS console carry out the following steps
We are going to create three keys, so repeat the below step three times
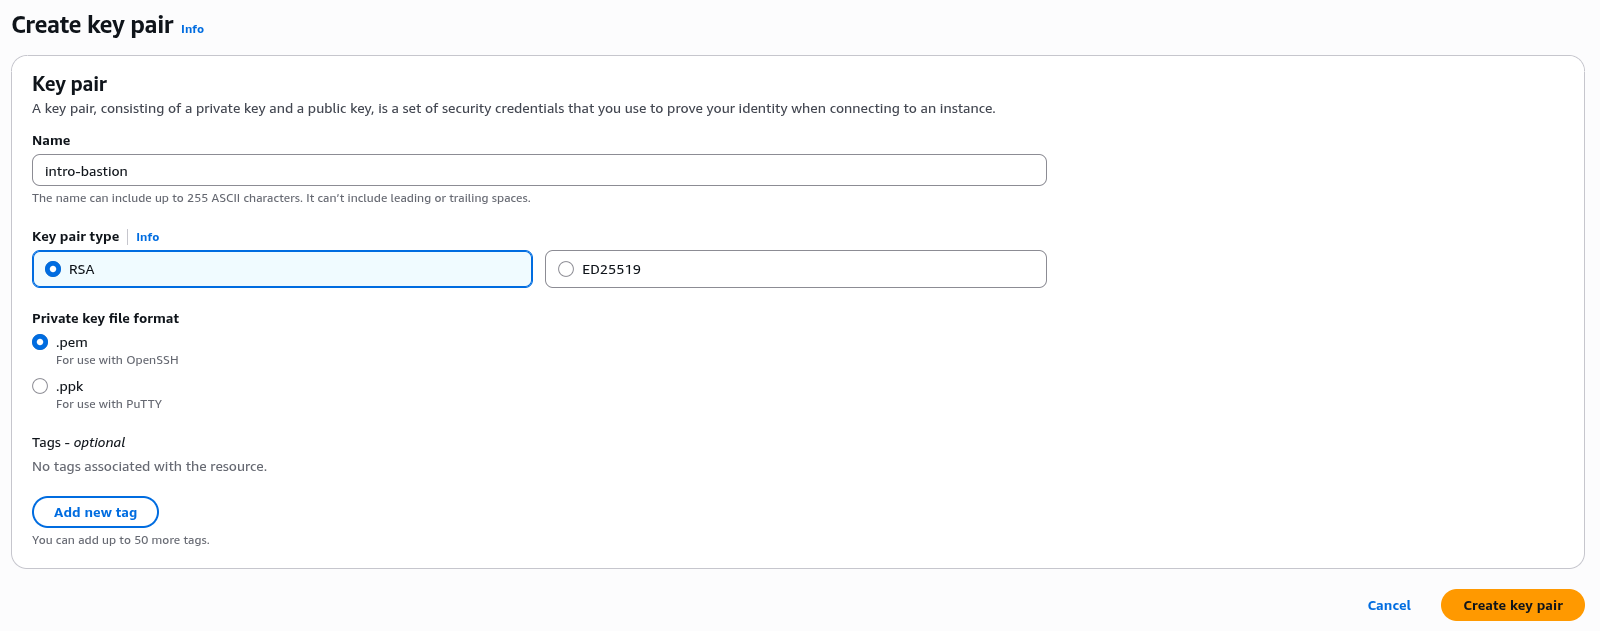
Go to the AWS Console, Select the EC2 service and go to Key Pairs in the left hand menu
Click "Create Key Pair"
Under Name enter exactly "intro-bastion", "intro-web" and "intro-application" for the three key names
For the key types leave as the defaults as "RSA" and ".pem" files.
Click "Create key pair", this will prompt you to download the key, make a note of the download location.
Once you have downloaded the keys, locate them in your "Download" directory and copy them to your "keys" subdirectory as created above.
The shh application is strict about the security of the access keys so once you have copied the keys you need to ensure they are only usable by your user login. In a terminal session change to the directory where you copied your keys to and run "chmod 400 (your key file name) e.g. "chmod 400 ./intro-bastion.pem".
Once this is done, change to your ".ssh" directory
Create a new file called "config" using your favourite text editor (VS Code is recommennded for graphical edits, vi / vim / emacs or nano if you wish to work in the terminal);
Insert the text below
Host bastion
    User ec2-user
    HostName
    Port 22
    IdentityFile ~/keys/intro-bastion.pem

Host web
    User ec2-user
    HostName 10.0.8.10
    Port 22
    IdentityFile ~/keys/intro-web.pem
    ProxyJump bastion

Host application
    User ec2-user
    Hostname 10.0.16.10
    Port 22
    IdentityFile ~/keys/intro-application.pem
    ProxyJump bastion
Save and exit
We will need to edit this file one more time but this will allow us to seamlessly and securely access all the EC2 instances we will set up in AWS.
Configuring Windows
First check that ssh is installed on your instance. Open the PowerShell console and type run the command ssh. If you see a list of usage flags continue with the next steps, if not install ssh using the guide here How to Enable and Use Windows 10's New Built-in SSH Commands.
If you are running an older version of Windows there is a second option at the bottom of this section.
As the default login user go to your home directory e.g. C:\Users\User1\, make a note of this Directory
Create a subdirectory for your ssh keys e.g. "mkdir keys"
Check to see if there is a ".ssh" subdirectory using "dir .", if not create it with "mkdir .ssh"
In the AWS console carry out the following steps
We are going to create three keys, so repeat the below step three times
Go to the AWS Console, Select the EC2 service and go to Key Pairs in the left hand menu
Click "Create Key Pair"
Under Name enter exactly "intro-bastion", "intro-web" and "intro-application" for the three key names
For the key types leave as the defaults as "RSA" and ".pem" files.
Click "Create key pair", this will prompt you to download the key, make a note of the download location.
Once you have downloaded the keys, locate them in your "Download" directory and copy them to your "keys" subdirectory as created above.
Once this is done, change to your ".ssh" directory, in Powershell "cd .ssh".
Create a new file called "config" using a text editor, from Powershell you can use "notepad config";
Insert the text below, note change the path C:\Users\User1\keys\ to the actual Windows path to your keys directory;
Host bastion
    User ec2-user
    HostName
    Port 22
    IdentityFile C:\Users\User1\keys\introBastion.pem

Host web
    User ec2-user
    HostName 10.0.8.10
    Port 22
    IdentityFile C:\Users\User1\keys\introWeb.pem
    ProxyJump bastion

Host application
    User ec2-user
    Hostname 10.0.16.10
    Port 22
    IdentityFile C:\Users\User1\keys\introApplication.pem
    ProxyJump bastion
Save and exit. If you used notepad it may insist on saving the file with a .txt extension, you can remove this in file explorer or in Powershell by using "mv config.txt config".
We will need to edit this file one more time but this will allow us to seamlessly and securely access all the EC2 instances we will set up in AWS.
Windows Option 2: Use the Bitvise ssh client
If ssh isn't working well on Windows, we can use the free Bitvise ssh client.
Download and install Bitvise from Bitvise Downloads.
Open the application and create a New Profile, save it somewhere sensible as "introlabs".
Go to the "Client Key Manager" and Import the keys from the directory you saved them in. The profile names seem to be staticso I would recommend importing "intro-bastion.pem" as "Profile 1", "intro-web.pem" as "Profile 2" and "intro-application.pem" as "Profile 3". Save your profile.
To log in to the bastion host, enter the IP address of the host in the Host box, set the port to be 22 (do not check "Enable Obfuscation"), for the user name enter "ec2-user", set the Initial method to be "publickey" and the Client Key to be "Profile 1".
Click "Log In", you should see the authentication handshake completing. Now click "New terminal console" on the left hand menu and you should be presented with an ssh session to the host in a terminal window. Note that if you exit the terminal session you do not exit the connection, you have to click "Log Out" to completely log out.
This client does not support seamless proxy forwarding. Although there is a way around his using the following steps.
Stay logged in to the intro Bastion server and carry out each of these steps;
- In the Bitvise Client, click on "New SFTP window" in the left hand menu. You should see a new window open with a list of local and remote files.
- In the local files directory navigate to the keys directory you created earlier e.g. "C:\Users\User1\keys\".
- In the Remote files listing, right click and select ""Create folder". Call the folder keys, create it and then double click on it to change to that directory.
- Select the files introWeb.pem and introApplication.pem, then drag them to the right hand listing to copy them.
- You can now close the SFTP Window
- Click on "New terminal console" to open a new terminal window.
- Change in to the keys directory using "
cd keys
". Change the permissions for both the key files using "
chmod 400 *.pem
". If you run "
ls -l
" now you should see the two key files with the permissions "-r--------.". SSH generally requires that the key files are readable only by the user calling the ssh command.
- When the webserver in up and running you should be able to connect using the command "
ssh -i /home/ec2-user/keys/introWeb.pem ec2-user@10.0.8.10
", changing the IP address if required
- Equally for the application server you should use the command "
ssh -i /home/ec2-user/keys/introWeb.pem ec2-user@10.0.16.10
", again changing the IP address if required
The AWS CLI
Although not essential to complete these labs it is worth installing the AWS command line interface as it will make some of the later tasks easier, and is useful as over time it is useful to have a library of scripts to manage the cloud environment. It should take around 5 to 10 minutes to download the command line tools to your laptop and configure it with IAM access permissions.
The homepage for the AWS CLI (Version 2) is here https://docs.aws.amazon.com/cli/latest/userguide/cli-chap-welcome.html
Download links and instructions are here https://docs.aws.amazon.com/cli/latest/userguide/getting-started-install.html
Follow the instruction for your operating system to install the CLI. Once installed you should be able to test by running aws --version. If you have issues there is a troubleshooting guide.
Once you have installed the CLI we need to add our AWS IAM user credentials to allow us to access our AWS account. In a production setting we would configure an identity provider to issue short lived and frequently rotated credentials. However, as this is a pure development environment we will use long lived credentials linked to our IAM user
In the AWS Console, go to the IAM console then select Users under Access Management.
Select the user you created earlier e.g. "cloudsandlight" then select the Security credentials tab
In the "Access keys" section, select "Create access key"
For use case select "Command line CLI". The console will suggest alternatives but check "I understand the above recommendation and want to proceed to create an access key." Click Next
It will now ask for a description, I would suggest "IAM User Access for Clouds and Light Course Development". Then click "Create access key"
You now have one opportunity to download the keys, select "Download .csv file" but do not navigate away from this page just yet!
Open the CSV file you just downloaded, it is recommended that you open this in a simple text editor such as a console session or VS Code.
On your laptop command line run "aws configure". The first two values, specifically the AWS Access Key ID and the AWS Secret Access Key, should be copied from the downloaded CSV file, the next two can be copied as below;
AWS Access Key ID : AKIAIOSFODNN7EXAMPLE
AWS Secret Access Key : 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
Default region name : eu-west-1
Default output format : text
To test it has worked, run the command "aws ec2 describe-vpcs", you should see output describing your VPC as follows;
VPCS    10.0.0.0/16     dopt-0011c872dd373560a  default False   781713352807    available       vpc-06bc055c6dd623b5d
BLOCKPUBLICACCESSSTATES off
CIDRBLOCKASSOCIATIONSET vpc-cidr-assoc-0d8c500eeac0fe58b        10.0.0.0/16
CIDRBLOCKSTATE  associated
TAGS    Name    intro-course-vpc
Note that the CLI does store your credentials in a plain text file, for Linux and mac this is found at $HOME/.aws/credentials. Also note (for later reference) that you can use a role credential with the AWS CLI, there is some documentation here - https://docs.aws.amazon.com/cli/latest/userguide/cli-configure-role.html
If everything is working you can close the CSV download page in your browser and delete the downloaded CSV file.
Create an EC2 Instance
Creating our first EC2 instance for the Bastion Host
In the console, search for EC2 and go to the EC2 homepage. Select "Instances" in the Instances drop down menu on the left column of the page. Ensure that your chosen AWS region e.g. "Europe (London)" is selected in the top right drop down menu in the console (the same region you set your VPC up in).
In the top right select the "Launch Instances" orange button, this should take you to the "Launch an instance" form
Give the instance a name, in this case we can call it "intro-bastion-host"
In the Amazon Machine Image (AMI) drop down select the default the default "Amazon Linux 2023".
For Architecture change to "64-bit (Arm)" and set the instance type to "t4g.nano"
Under key pair select your key created earlier "intro-bastion"
Under Network settings click edit.
For VPC ensure you have the "intro-course-vpc" selected
For Subnet you may need to change this, select "intro-course-management" this should have the CIDR range as 10.0.0.0/28
For auto assign public IP change this to "Enable"
Under Firewall select "Select Existing Security Group" and select "intro-bastion-host"
We don't need to make any changes in "Advanced Network Configuration"
Under storage the default of 8GiB storage is fine
We don't need to make any changes to "Advanced details".
Click on the "Launch instance" button on the right and the instance will launch.
If you click on the instance name in the green bar you can check on launch progress.
Once the instance has launched it will have a public IP address. Copy this to your scratchpad under "Bastion Public IP Address"
Go back your ".ssh/config" file on your laptop and change the first block to include the public IP address in the host name section as shown in the example below. If you didn't make a note of the instance's public IP address go to the EC2 console, select the "intro-bastion" instance and it will be displayed in the "Details" section of the webpage, you can copy it from there.
Host bastion
    User ec2-user
    HostName 3.54.23.226
    Port 22
    IdentityFile ~/keys/intro-bastion.pem
Save and exit
This instance will be our Bastion or Jump host. It is the only instance we will use to connect to for interactive shell access and is a common pattern for interactive shell access.
Because we set up the ssh config file you should now just be able to type "ssh bastion" on your command line and connect, if it asks to accept the key just type "yes"

Once you are logged in we don't need to do much more, so just type "exit" to leave the login.
Creating our Base Server Image
Once we have created our bastion host, we can then create the images for our web and application servers.
The default operating system images supplied by AWS are useful but don't contain all the software we need for the application and web servers. Therefore, we will install the software we need once, and save the resulting machine image to use to launch all our subsequent servers from. The use of images with the operating system and application code is a powerful concept in cloud architectures as it allows us to create virtual machines with specific functions which launch quickly without the need for additional software installation post boot time.
In the console, search for EC2 and go to the EC2 homepage. Select "Instances" in the Instances drop down menu
In the top right select the "Launch Instances" orange button, this should take you to the "Launch an instance" form
Give the instance a name, in this case we can call it "intro-web-server"
In the Amazon Machine Image (AMI) drop down select the default the default "Amazon Linux 2023".
For Architecture change to "64-bit(Arm)" and change the instance type to "t4g.nano"
Under key pair select the key you created earlier "intro-web"
Under Network settings click "Edit".
For VPC ensure you have the "intro-course-vpc" selected
For subnet you may need to change this, select "intro-course-subnet-public1-(your region))a" which will have the IP address range "10.0.8.0/24".
For auto assign public IP change this to "enable", we will be accessing this as a public webserver so it needs a public IP address
Under security group select "intro-web-server"
Click on "Advanced network configuration" and change the "Primary IP" field to "10.0.8.10", note you may have to type over a suggested default value in the input box.
Leave storage as 8Gib of gp2 storage
We do not need to set backup on this server
We are now ready to start the server but before we do that we can click on the "Preview Code" link. This shows us the API calls which are made to carry out the start instance operation.
Once we have done this we can click on the "Launch Instance" button
Click on the instance name and you will see it in your list of instances.
It will take a few minutes to start the instance. You can use the time to look at the instance in more detail or have a coffee.
Once the instance has started the status check will change from "initialising" to "3/3 checks passed". Thee is a refresh button at the top of the EC2 instances page you can click to refresh the instance status.
Once the instance has started view it in the AWS EC2 console and make a note of the public IP address, copy this to your Scratchpad document under "Webserver Public IP Address"
Your server should be ready to use
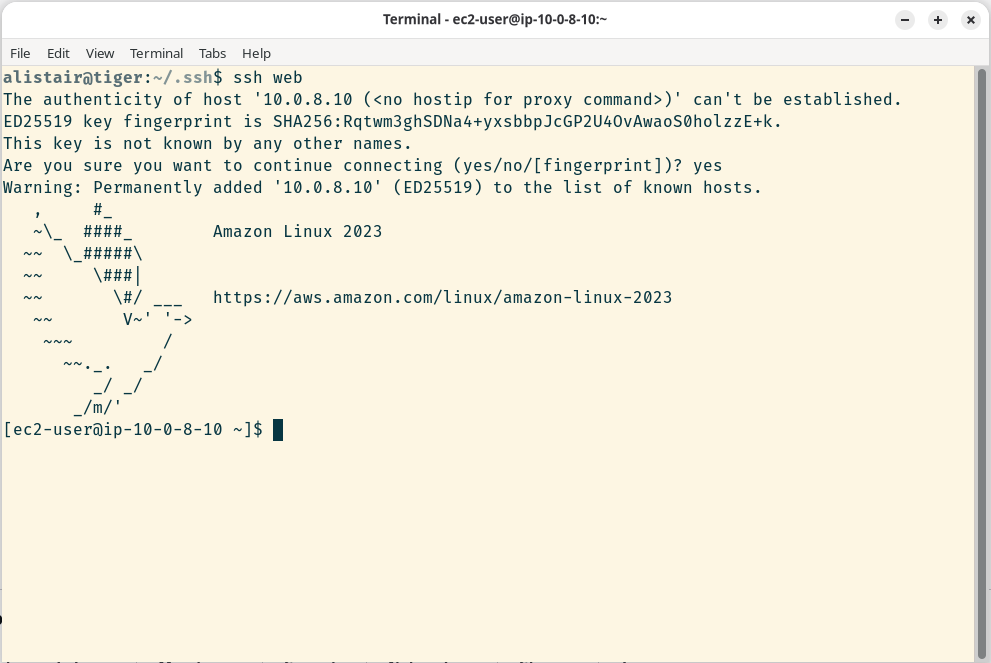
You can now connect using the following command on your laptop;
ssh web
This opens a connection to the bastion host, then uses this as a proxy to connect to the webserver instance. You should see a session like the screen below
We now have our first base server to build on.
Building the Webserver
We can now install software on our base image. However, because we created a restrictive security group which does not allow outbound http and https connections this will initially fail.
To address this we will create a new security group specifically for software updates and attach it to this instance
Go to "EC2" in the AWS console and select "Security Groups", select "Create security group"
Under Basic Details call the group "intro-software-update"
Under description add "Allows instance to download http and https from the Internet" and under VPC select "intro-course-vpc"
Do not add any Inbound Rules but under outbound rules add the following two rules
Type "HTTP", Destination "Anywhere-IPv4", Description "Download any HTTP"
Type "HTTPS", Destination "Anywhere-IPv4", Description "Download any HTTPS"
It should look like the image below;
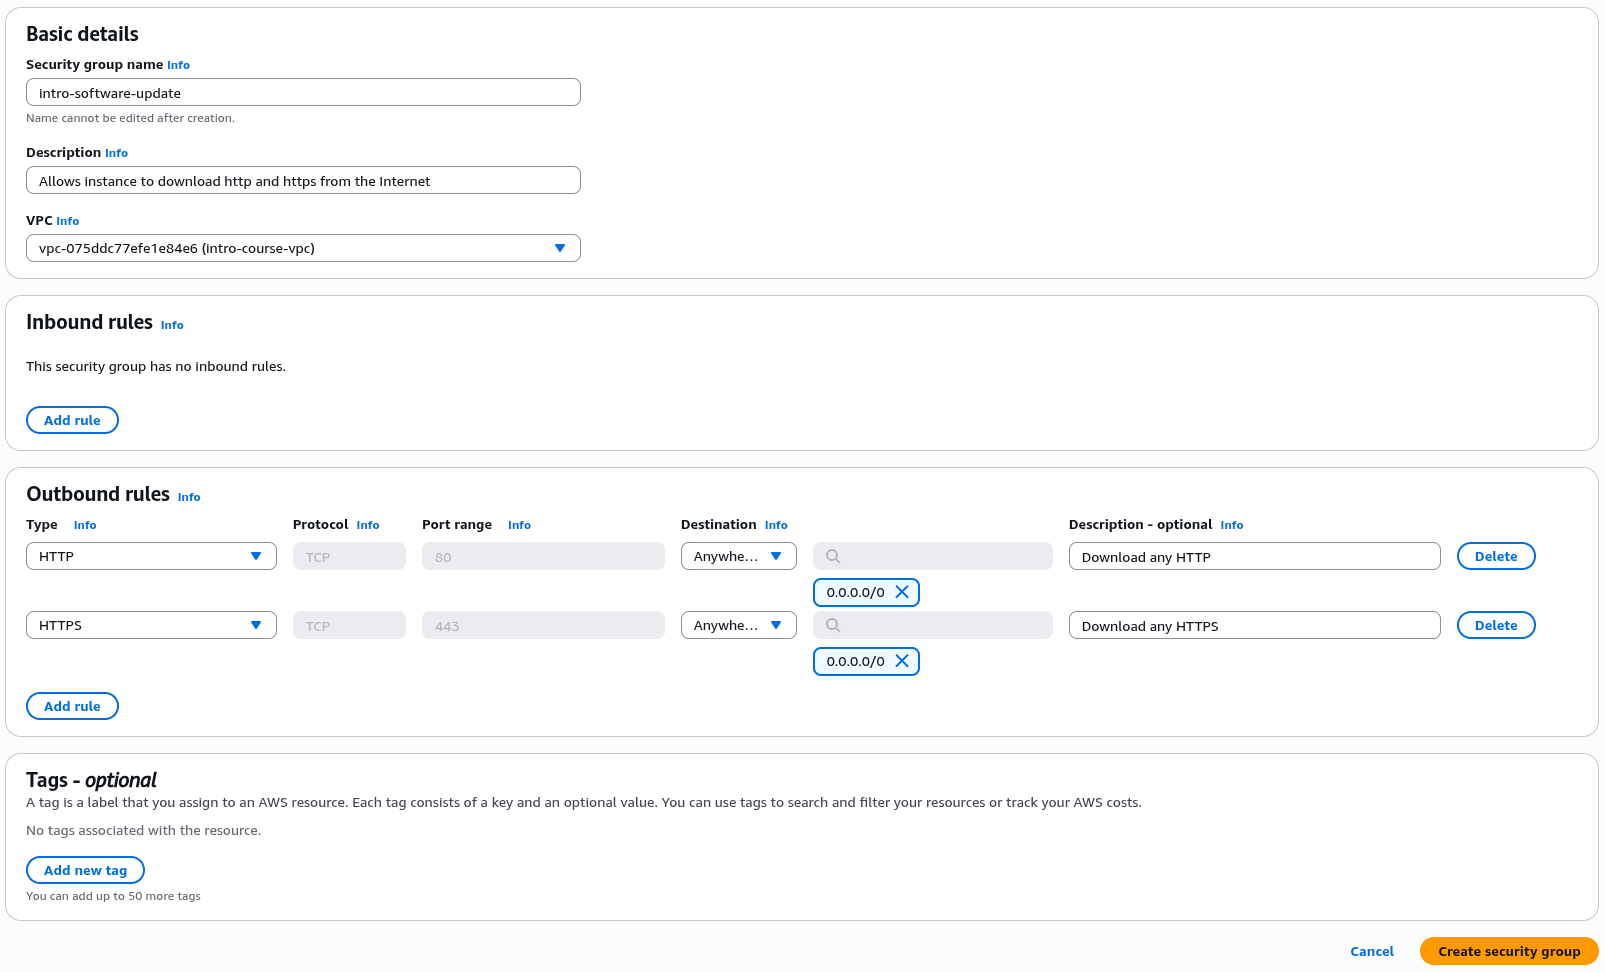
Click "Create security group" to create the group.
Now we will attach the security group to the instance. Go to "EC2" and select "Instances", the select the "Intro Web Server" instance.
In the top right you will see an "Actions" menu, select "Security" then "Change Security Groups"
Under "Associated security groups" select the "intro-software-update" group we just created then select "Add security group"
We should see the instance now has two security groups "intro-web-server" and "intro-software-update". Click "Save" to confirm
We can now run software updates from this instance. Once we are running instances based on this image in production we can remove this group to enhance security.
This demonstrates a very powerful security concept in AWS. We can change the allowed network connections for any instance on the fly and with almost zero latency for the changes to take effect. This means that as you build out production environments you can make these changes as part of a build or deployment process. So you could, for example, have a deployment process which adds a security group to allow acces to a specific software downloads, runs the update commands on the instance being built then removes the security group once the downloads have completed, all driven by automation.
Updating the Webserver
Going back to our terminal logged into the web server instance, we can now install the Apache Webserver. To do this we use the "yum install" command to add a Linux package. We will also use sudo to carry out an operation using privileged access.
In Amazon Linux the "httpd" package contains a recent version of the Apache webserver ( see https://httpd.apache.org/ for more details), enter
sudo yum install httpd
It will present a list of packages to install, type "yes" to install them all
Once the webserver in installed, we need to use the Linux "systemctl" service to start the httpd service.
To start the httpd webserver, type
sudo systemctl start httpd
To enable the service so it starts whenever the Linux VM is booted, type
sudo systemctl enable httpd
We can check that the server is running with
sudo systemctl status httpd
This should return a status report that looks like;
[ec2-user@ip-10-0-8-10 ~]
$ sudo systemctl status httpd
● httpd.service - The Apache HTTP Server
     Loaded: loaded (/usr/lib/systemd/system/httpd.service; enabled; preset: disabled)
     Active: active (running) since Wed 2025-09-17 10:30:07 UTC; 19s ago
       Docs: man:httpd.service(8)
   Main PID: 26057 (httpd)
     Status: "Total requests: 0; Idle/Busy workers 100/0;Requests/sec: 0; Bytes served/sec:   0 >
      Tasks: 177 (limit: 1002)
     Memory: 13.2M
        CPU: 69ms
     CGroup: /system.slice/httpd.service
             ├─26057 /usr/sbin/httpd -DFOREGROUND
             ├─26058 /usr/sbin/httpd -DFOREGROUND
             ├─26059 /usr/sbin/httpd -DFOREGROUND
             ├─26060 /usr/sbin/httpd -DFOREGROUND
             └─26061 /usr/sbin/httpd -DFOREGROUND
Warning
You may need to hit the q key at this point to exit.
If you don’t see this status, double check the steps above and ensure you installed the httpd server, running sudo yum list installed|grep httpd should list the package if it is installed.
To see your website in action, go to your web browser and go to http://18.170.27.69/ (changing the IP address to the Public IP address of your EC2 instance from your scratchpad, note this is http not https)
This should now show a webpage with the simple message "It works!"
We are now ready to add content to our server, and gradually link it to other services
Installing Additional Packages
Now that we have installed the webserver, we should install the additional software packages we will use for connecting to a SQL database and the AWS Elastic File System in later stages.
We will install;
- The MySQL command line tools
- The Python PIP package manager
- Using PIP we will install the Python MySQL connector package
- The AWS EFS (Elastic File System) Helper tools
To manage the database we will need to install the maria database command line tools, for the purpose of our exercise Maria DB and MySQL are the same software.
These can be installed using the command
sudo dnf install mariadb105
answer yes when prompted.
You can test they have installed correctly using the command "mysql --version", you should see a response of the form "mysql Ver 15.1 Distrib 10.5.29-MariaDB, for Linux (aarch64) using EditLine wrapper".
To install the PIP Python package manager use
sudo dnf install python3-pip
Once this is done we can install the mysql.connector module using the following command;
sudo pip3 install mysql-connector
Note you will see a warning message about install conflicts, we can safely ignore this for the purpose of this exercise.
Then we can install the EFS Utilities we will use later with;
sudo yum install -y amazon-efs-utils
We have now installed all the additional software we need for the web and application server.
Now we have installed the additional software we can remove the software update security group.
Go back to Instances in the EC2 console. Select the "intro-web-server".
In the "Actions" menu select "Security" then "Change Security Groups". Find the "intro-software-update" security group (make sure you select the correct group) and click "Remove" then click "Save" to save the changes.
Adding Website Content
In your ssh session to the ec2 instance, go to the webserver content page by typing
cd /var/www/html/
We will now create a new home page. If you are familiar with vi (or vim) as a Unix text editor, use that. If not we can use nano
Either type "sudo vi index.html" or "sudo nano index.html"
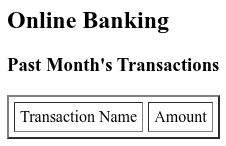
In your new document enter content like the below
<HTML>
        <HEAD>
                <TITLE>Internet Banking Test Site</TITLE>
        </HEAD>
        <BODY>
                <H2>Online Banking</H2>
                <H3>Past Month's Transactions</H3>
                <TABLE BORDER=2 CELLSPACING=5 CELLPADDING=5>
                        <TR>
                                <TD>Transaction Name</TD><TD>Amount</TD>
                        </TR>
                </TABLE>
        </BODY>
</HTML>
To save and exit vi type ":wq" in nano it's O then X, note if you are using a terminal session on a mac, some key mappings may be different and left and right keys may be mapped differently.
If you reload your home page, you should now see your content has replaced the default page. Right now it isn't very impressive, and certainly isn't going to win any design awards, but it's fine as a simple testbed.
Webserver Testing
Clicking the button below will test the Web Server setup.
- Testing EC2 Instance Placement
- Testing EC2 Instance Configuration
- Testing Internet Connectivity to Web Server on port 80
Adding a dynamic webpage element
</br>Our next step is to add a dynamic element to our webpage, so our list of current transactions is generated by a script
Fortunately, we can do this by using Apache Webserver Server Side Includes and we will build an initial (very simple) Python script to generate a list of transactions.
These steps are a little complex so please follow carefully and go back and debug if needed.
Install the first Python script
To save time we are now going to change our ssh user to the Linux root account. Run the following command
sudo su
You should now see your command prompt has changed from "ec2-user" to "root".
First we will change the directory to the webserver’s scripts directory
Enter
cd /var/www/cgi-bin/
It will be empty so we can create our first script
Using the editor of your choice enter "vi transactions.py" or "nano transactions.py"
Enter the following script (CHECK FOR PASTE ERRORS, watch out for Unicode characters). CTRL + i in Vi for insert mode.
#!/usr/bin/env python3

names = ["Gails Bakery", "Transport for London", "Octopus Energy", "Uber", "Cancer Research UK", "Netflix", "Amazon", "Boots", "Transport for London"]
amounts = [7.44, 8.10, 54.20, 21.00, 10.00, 14.99, 72.12, 4.49, 3.90]

n=len(names)
total = sum(amounts)

print ("Content-Type: text/plain\n")

for i in range (n):
   print ("<TR><TD>", end='')
   print(names[i], end='')
   print ("</TD><TD>", end=	'')
   print (f"{amounts[i]:0,.2f}", end='')
   print ("</TD></TR>")

print ("<TR><TD> Total </TD><TD>", end='')
print (f"{total:0,.2f}", end='')
print ("</TD></TR>")
Save and exit the file
The script does the following things;
- First we specify the version of Python we are using and the directory it is in
- Then we create two lists of values, names contains the list for merchants we have transactions with and the second the value of the transaction
- len(names) gives us the number of items in the names list for our loop
- sum(amounts) gives us a sum of the numeric values in amounts
- We print out the content type the script is returning, note in the case of Server Side Includes this is text/plain rather than text/html
- We then have a loop for each item in the names, based on the count n
- For each item we print out a HTML table row with the merchant name and transaction value
- When the loop is finished we print a final row with the total of the transaction values
Note, this isn’t necessarily the best way to construct a Python script, we are using very simple examples for legibility.
Now we need to make the script executable and then run it to test it works
Make the script executable using the command "chmod 755 ./transactions.py"
Then run it using the command "./transactions.py"
You should see an output of the form
[root@ip-10-0-8-10 cgi-bin]# ./transactions.py
Content-Type: text/plain

<TR><TD>Gails Bakery</TD><TD>7.44</TD></TR>
<TR><TD>Transport for London</TD><TD>8.10</TD></TR>
<TR><TD>Octopus Energy</TD><TD>54.20</TD></TR>
<TR><TD>Uber</TD><TD>21.00</TD></TR>
<TR><TD>Cancer Research UK</TD><TD>10.00</TD></TR>
<TR><TD>Netflix</TD><TD>14.99</TD></TR>
<TR><TD>Amazon</TD><TD>72.12</TD></TR>
<TR><TD>Boots</TD><TD>4.49</TD></TR>
<TR><TD>Transport for London</TD><TD>3.90</TD></TR>
<TR><TD> Total </TD><TD>196.24</TD></TR>
If you see errors it may be because Unicode characters have been added during copy and paste. The most common error is substitution of left and right open and close double quotes, python expects a single form of double quote i.e. " . The other error to watch out for is that Python is a language that requires significant indentation - see W3 schools for a useful explanation. Double check that when you copied the code the indentation below the line "for i in range (n):" was preserved.
Secondly as this is a development environment we are going to add some debug information to our page using a simple shell script which pulls back the metadata for our EC2 instance and displays in on the webpage. Many production applications have some functionality of this type normally activated with a special cookie or form parameter, but in this case we will display it every time.
Still in the "/var/www/cgi-bin" directory we will create a new shell script called hostname.sh
Edit this with "vi hostname.sh" or "nano hostname.sh"
Enter the following data and save the file
#!/usr/bin/sh
TOKEN=`curl -s -X PUT "http://169.254.169.254/latest/api/token" -H "X-aws-ec2-metadata-token-ttl-seconds: 21600"`
ECHOSTNAME=`curl -s -H "X-aws-ec2-metadata-token: $TOKEN" http://169.254.169.254/latest/meta-data/local-hostname`
ECINSTANCEID=`curl -s -H "X-aws-ec2-metadata-token: $TOKEN" http://169.254.169.254/latest/meta-data/instance-id`
COLOUR1=${ECINSTANCEID:7:6}
COLOUR2=${ECINSTANCEID:13:6}
printf "Content-Type: text/plain\n\n"
printf "<BR><BR><TABLE WIDTH=100%%><TR>\n"
printf "<TD COLSPAN=2 BGCOLOR=$COLOUR1>Server Info </TD> </TR>\n"
printf "<TR><TD>The EC2 Local Hostname is </TD><TD>$ECHOSTNAME</TD></TR>\n"
printf "<TR><TD>The EC2 Instance ID is </TD><TD>$ECINSTANCEID</TD></TR>\n"
printf "<TR><TD COLSPAN=2 BGCOLOR=$COLOUR2>Script Ends </TD></TR></TABLE>\n"
Now we need to make the file executable
Enter "chmod 755 hostname.sh"
You can now test this file by simply entering "./hostname.sh"
You should see output as follows;
<TABLE WIDTH=100%><TR>
<TD COLSPAN=2 BGCOLOR=aa0c73>Server Info </TD> </TR>
<TR><TD>The EC2 Local Hostname is </TD><TD>ip-10-0-10-219.eu-west-2.compute.internal</TD></TR>
<TR><TD>The EC2 Instance ID is </TD><TD>i-097a7aa0c739a2d9c</TD></TR>
<TR><TD COLSPAN=2 BGCOLOR=9a2d9c>Script Ends </TD></TR></TABLE>
This code uses a AWS service which runs on every EC2 instance called the EC2 metadata service. This allows us to retrieve internal information about the running instance including its instance ID and hostname.
The use of colour in the HTML output is a simple visual indicator for debugging. If we were looking at multiple instances built from the same image this would give us a simple visual clue if the same content was being served from two different instances, this will be used in later courses.
Configuring the Webserver to Process the Files
Now we will configure our homepage to process the script and include it in our home page. To do this we will use an Apache feature called Server Side Includes ( https://httpd.apache.org/docs/current/howto/ssi.html ). These allow us to run a script on the webserver and include the results of that script in a webpage. Again note that this isn’t the best or most current way to run web development in production today, but allows us to demonstrate some key cloud functionality.
Change to the server content home page "cd /var/www/html"
Now edit the index.html file using "nano index.html" or "vi index.html"
Add the two lines starting
<!--
shown below.
<HTML>
        <HEAD>
                <TITLE>CLO - Internet Banking Test Site</TITLE>
        </HEAD>
        <BODY>
                <H2>Online Banking</H2>
[h3]
Transactions March 2025[/h3]

                <TABLE BORDER=2 CELLSPACING=5 CELLPADDING=5>
                        <TR>
                                <TD>Transaction Name</TD><TD>Amount</TD>
                                <!--#include virtual="/cgi-bin/transactions.py"-->
                        </TR>
                </TABLE>
                <!--#include virtual="/cgi-bin/hostname.sh"-->
        </BODY>
</HTML>
The "<!--# -->" syntax is a special command which tells the webserver to run the included command
Save the file
Now that we have added a server file include we need to make it executable. This is used to give the webserver and indication to process the webpage for included statements
Enter "chmod 755 index.html"
If this works we are 90% of the way there.
Configuring Apache to process server side include directives
By default the installed version of Apache won’t process Server Side Includes, so we need to make a change to the configuration file to enable this.
Enter "cd /etc/httpd/conf/"
This contains the main Apache configuration file, "httpd.conf"
Before we edit the file we should make a backup, so run "cp httpd.conf httpd.conf.bak"
The httpd.conf file is 358 lines long, so we will use line number in our editor to reference the lines we need to change
If you are editing the file with nano use the command "nano -l httpd.conf" to show line numbers.
If you are editing the file with vi edit the file with "vi httpd.conf" then when vi opens the file enter ":set number" to show line numbers on the left hand side.
First we need to ensure we have support for cgi scripts
At line 61 you should see a line which says
Include conf.modules.d/*.conf
Add the following line below this;
LoadModule cgi_module modules/mod_cgi.so
Go to line 150 ( in Vi :150) which should look like
Options Indexes FollowSymLinks
Change this as follows (add the section in bold, Includes on the first line then XBitHack On on the line below)
Options Indexes FollowSymLinks Includes
XBitHack On
Finally we need to customise the cgi-bin settings
At line 256 you should see a section as follows;
#
# "/var/www/cgi-bin" should be changed to whatever your ScriptAliased
# CGI directory exists, if you have that configured.
#
<Directory "/var/www/cgi-bin">
     AllowOverride None
     Options None
     Require all granted
</Directory>
Change this to
#
# "/var/www/cgi-bin" should be changed to whatever your ScriptAliased
# CGI directory exists, if you have that configured.
#
<Directory "/var/www/cgi-bin">
    Options +ExecCGI
    AddHandler cgi-script .cgi .py
    Order allow,deny
    Allow from all
</Directory>
Save and exit the file
Now we just need to restart the webserver process
Enter "systemctl restart httpd"
You can check it has restarted with "systemctl status httpd" (remember you may need to type "q" to exit).
If all is good reload your homepage and you should see
Note that the instance ID and hence banner colours will be different for every instance.
To experiment go to your script at /var/www/cgi-bin/transactions.py ( cd /var/www/cgi-bin/transactions.py )
Edit it with vi or nano and experiment with adding or changing the values of the lists, if you save and reload the webpage you should see the new values. Note if you don’t have an equal number of transaction items and values the script may break, it has no error checking and is not ready for production yet.
Building a more secure service
So far we have built a webserver with a script as a very simple example of how to run a server in the cloud. But to make the environment more secure (and scalable) it would be better to run the public facing webserver facing the Internet and the server running the scripts and holding custom transaction data in a private network. Again this is massively simplified from how this would be run in a real production environment but the core ideas are here.
Creating Server Images
Amazon (and all the major public clouds) have a very useful capability to create images of the VMs you create and all the software running on them. This is very useful for horizontal scaling architectures where we treat multiple virtual machines as a pool of compute. In AWS these are referred to as AMIs or Amazon Machine Images.
We will create a new image from our first webserver.
Make sure our webserver image is stopped; go to the EC2 Instances in the console, select the "intro-web-server" instance, select the "Instance State" menu, then select "Stop instance" (not Terminate!) then click "Stop".
Once the Instance state has changed from "Stopping" to "Stopped" (this generally takes no more than 90 seconds), select the stopped instance and go to "Actions" - "Image and Templates" - "Create image"
For name call it "intro-webserver-image" - for Image Description call it "Intro Webserver Image and (today's date and time)" e.g. "intro Webserver Image 20 September 2025".
As we have already stopped the image, we do not need to select "reboot instance".
This should be all we need to change, click "Create image"
Go to "AMIs" in the EC2 menu. You should see the newly created "intro-webserver" AMI here. After a couple of minutes you should see its status has changed to from "Pending" to "Available".
You can now go back to your list of server instances under EC2 in the AWS console. and restart the Web Server Instance. Select the instance and under the "Instance State" menu select "Start Instance". It will take two to three minutes to start and note when it restarts it will have the same private but a new public IP address.
Creating the Application Server
We will now create our application hosting server. In the real world this would be a feature rich runtime environment capable of managing complex application functionality and holding session state for multi stage web workflows. But in our case we are going to use a few simple python scripts on a webserver to demonstrate the cloud architecture concepts.
We can now create a new application server instance from the webserver image
Go back to Instances in the EC2 console.
Select "Launch Instances" in the console.
For this instance we are going to call it "intro-application-server"
Under Application and OS Images select the tab called "My AMIs", check the radio button "Owned by me"
You should see the "intro-webserver-image" image, select it.
For instance Type choose "t4g.nano"
For Keypair select "intro-application"
Click Edit Network Settings
The selected VPC should be the "(intro-course-vpc)"
For the Subnet select "intro-course-subnet-private1-(your region)a" this will have the CIDR range "10.0.16.0/24"
For auto assign public IP we can leave this as "Disable", this instance is going to be in a private subnet with no Internet access
For security groups we are going to select "Select existing security group" then "intro-application-server". This security group allows HTTP access only from the public subnets in our VPC and SSH access only from our management subnet.
Click on "Advanced Network Configuration" and under primary IP enter "10.0.16.10" (remembering you have to type over the default)
This should all we need to change, click on "Launch Instance"
Go back to the EC2 instances view and wait for the instance to launch, this should take 2 to 3 minutes.
Once it is launched you should be able to log into it simply by typing "ssh application" from your laptop. This will log into our bastion host then launch a second connection to the newly created application server (again you may have to accept the connection when you first connect, just type "yes" )
Once logged in check to see if the webserver is running with "ps -ef|grep httpd"
You should see output of the form
root        1440       1  0 16:11 ?        00:00:00 /usr/sbin/httpd -DFOREGROUND
apache      1558    1440  0 16:11 ?        00:00:00 /usr/sbin/httpd -DFOREGROUND
apache      1559    1440  0 16:11 ?        00:00:00 /usr/sbin/httpd -DFOREGROUND
apache      1574    1440  0 16:11 ?        00:00:00 /usr/sbin/httpd -DFOREGROUND
apache      1604    1440  0 16:11 ?        00:00:00 /usr/sbin/httpd -DFOREGROUND
At present the application server is an exact copy of the web server. So to demonstrate which server we are service code from we are going to make a change to our transactions script
cd /var/www/cgi-bin
Edit "transactions.py" using sudo vi transactions.py or sudo nano transactions.py
Under the line
"names = ["Gails Bakery", ...."
change some of the values in double quotes to new values, you may even want to change one to "Application Server" just so we can see the script is now running on the application rather than web server.
Finally we can test if the script is working by typing "curl http://127.0.0.1/cgi-bin/transactions.py"
You should see the HTML for our banking transactions, including the new transaction names you added.
Curl is the Unix command for issuing a http request, 127.0.0.1 is a reserved IP address that performs a loopback on a running instance, allowing us to test local services.
So now we can test if we can access our other webserver in the public subnet
Try typing "curl http://10.0.8.10/cgi-bin/transactions.py"
You should see that the command now hangs with no response. Although the server is up and running, the security group we applied to this instance does not allow any outgoing connections. This means it can respond to inbound connections, but can't make outbound connections of its own (apart from DNS and some AWS reserved services), you should be able to escape with CTRL+c
Finally we will make changes to the public webserver to connect it to the "application" server.
Exit from the application server (just type exit) to return to your laptop command line.
SSH to the web server using "ssh web"
Change to the web server content directory cd /var/www/html
You should now be able to edit the server home page which is index.html
So type "sudo vi index.html" or "sudo nano index.html"
We are going to change the line
<!--#include virtual="/cgi-bin/transactions.py"-->
To
<!--#exec cmd="curl http://10.0.16.10/cgi-bin/transactions.py" -->
(Note in vi "dd" will delete a line, "o" will insert a line below the current line). Your file should now look like;
<HTML>
        <HEAD>
                <TITLE>CLO - Internet Banking Test Site</TITLE>
        </HEAD>
        <BODY>
                <H2>Online Banking</H2>
[h3]
Transactions March 2025[/h3]

                <TABLE BORDER=2 CELLSPACING=5 CELLPADDING=5>
                        <TR>
                                <TD>Transaction Name</TD><TD>Amount</TD>
                                <!--#exec cmd="curl http://10.0.16.10/cgi-bin/transactions.py" -->
                        </TR>
                </TABLE>
                <!--#include virtual="/cgi-bin/hostname.sh"-->
        </BODY>
</HTML>
Save and exit
Application Server Testing
Clicking the button below will test the Application Server setup.
- Testing EC2 Instance Placement
- Testing EC2 Instance Configuration
- Testing Responses from the Scripts on the Application Server
So now we have changed the webserver from running a local script using the cgi-bin function to calling a script on the remote application server, which has no internet access. This is a very ugly way to do this, don't build production apps this way but again is fine for demonstration purposes. Our debug script will still run on the local server.
If you use your web browser to access the public internet facing website again you should see the script is now running on the application server, and you should see the new transaction names we added. Note that the web server instance will have a new public IP address once it has restarted, you can look this up by looking at the instance in the EC2 instance list and then looking at the Public IPv4 address under the details display.
Section Conclusion
While what we have built very simplistic it demonstrates some key cloud architecture concepts
We have built a network infrastructure with publicly routable (i.e. Internet facing) subnets and private subnets across three different availability zones.
We have customised the IP routing tables in these subnets so only the public subnets can route to the Internet, the three private subnets can only talk to the three public subnets and we have a management subnet which can route to both.
We have created security groups which only allow inbound connections on specific ports from specific IP address ranges, and specify which, if any, outbound connections are allowed form a server instance. We have also seen how security groups can be created for specific purposes, such as software update, then detached.
The combination of route tables and least privilege security groups actually represents close to best practice for deploying combination of public networks for static content and private networks for dynamic application code. A real public application with confidential data might use additional firewalls and operating system level firewalls in the running instances but we have the basics covered.
Creating the Database in AWS
In the AWS console search for "RDS".
Choose "Create a database", check that the region maps your chosen AWS region.
Under database creation methods, choose "Standard create"
For Engine options choose "MySQL"
Leave the engine version as the default
Under Templates choose "Sandbox" or "Free Tier"
For "Availability and durability" choose "Single-AZ DB instance deployment (1 instance)"
For DB Instance Identifier enter the name "intro-db-mysql"
Under credentials leave the master username as "admin"
For Credential Management for now choose "Self Managed"
Enter a password of your choice twice, make a note of the database password in your scratchpad. DO NOT use the same password as your login password.
For instance type leave as "db.t4g.micro" and for storage leave as "20 GiB"
Select "Connect to an EC2 compute resource"
In the EC2 instance drop down select "intro-application-server"
Note that this now creates a new securoty group which added to both the database and the application server to allow communication between the server and database.
Under DB Subnet Group select "Automatic Setup"
For public access select "No", we are only going to access this database from the private application server subnet
For VPC security group, the launch wizard will create and add a new security group so we will select "Create new" and give it the name "intro-private-rds-access"
For availability zone, ensure this is set to the same availability zone A setting as your application and webserver e.g. eu-west-2a
You can leave the certificate authority as the default
For database authentication you can leave as "Password Authentication"
At this point we don't need to modify any additional options, you can go ahead and click "Create database"
The console may prompt you with Suggested add-ons, we don't need these so can just close the pop up window.
As the database is created, make a note of its DNS hostname in your scratchpad under "RDS Database Hostname". Alternatively click on the DB Identifier once the database is et up and you will see the database endpoint listed so you can copy it.
Connecting to the Database
We will now connect to the database using the command line tools from the application server
Connect to the application server EC2 instance using "ssh application"
Once logged in you can now connect using the command (change the host name in bold to the database hostname from your console / recorded in your scratchpad)
mysql -h intro-mysql-db1.ctysq8mwiyve.eu-west-1.rds.amazonaws.com -P 3306 -u admin -p
Enter the password you created above. again as recorded in your scratchpad
If all has worked correctly you should see
Welcome to the MariaDB monitor.  Commands end with ; or \g.
Your MySQL connection id is 31
Server version: 8.0.42 Source distribution

Copyright (c) 2000, 2018, Oracle, MariaDB Corporation Ab and others.

Type 'help;' or '\h' for help. Type '\c' to clear the current input statement.

MySQL [(none)]>
You are now logged into the RDS database
Populating the Database
We will now create a database, a table for the transactions and populate the first transactions
We will start by running the "show databases;" command to list the existing databases, note for all the following transactions the trailing semicolons are important.
MySQL [(none)]> show databases;
+--------------------+
| Database           |
+--------------------+
| information_schema |
| mysql              |
| performance_schema |
| sys                |
+--------------------+
4 rows in set (0.011 sec)
This shows the default databases. We will create a new database for this application, enter
create database intro;
If you enter "show databases;" you can check it has been added
Now we can switch to this database using the "use" command
use intro;
You should see that the prompt has changed to
MySQL >
Now we will create a table to hold the transactions
Enter the following command (across multiple lines, hit enter at the end of each line)
MySQL [intro]
> CREATE TABLE if not exists transactions (
    -> sequence_number int(10) NOT NULL AUTO_INCREMENT,
    -> description varchar(50) NOT NULL DEFAULT '',
    -> value double(10,2) NOT NULL DEFAULT '0',
    -> PRIMARY KEY(sequence_number)
    -> ) ;

Query OK, 0 rows affected, 2 warnings (0.065 sec)
This has created a table with three columns
The first is a sequence number which is a simple counter which can be used to refer to any row on the database as it will be unique, it is a 10 digit integer
The second is used for the description of each transaction, it is a string with a max. length of 50 characters
The third column is used for the value of each transaction, it is a floating point number with up to 10 digits before the decimal point and two after.
Finally we specify "sequence_number" as the primary key for the database
We can check the status of our tables using the "show tables;" command
MySQL > show tables;

+------------------+
| Tables_in_intro |
+------------------+
| transactions     |
+------------------+
1 row in set (0.003 sec)
We can see more details of the table structure using "describe (tablename);", e.g.
MySQL > describe transactions;
+-----------------+--------------+------+-----+---------+----------------+
| Field           | Type         | Null | Key | Default | Extra          |
+-----------------+--------------+------+-----+---------+----------------+
| sequence_number | int          | NO   | PRI | NULL    | auto_increment |
| description     | varchar(50)  | NO   |     |         |                |
| value           | double(10,2) | NO   |     | 0.00    |                |
+-----------------+--------------+------+-----+---------+----------------+
3 rows in set (0.006 sec)
We have now constructed our table, it is time to populate it
Populating the Table
There is useful information on working with MySQL at https://www.mysqltutorial.net/mysql-generated-columns/
To add values to the table we use the INSERT command
The format is;
INSERT INTO table name (column separated by a comma) values (values in single quotes separated by commas);
e.g.
INSERT INTO transactions (description,value) values ('Transport for London','6.70');
At any point you can check what has been added to the table using "select * from transactions;"
MySQL [intro]
> select * from transactions;
+-----------------+----------------------+-------+
| sequence_number | description          | value |
+-----------------+----------------------+-------+
|               1 | Transport for London |  6.70 |
+-----------------+----------------------+-------+
1 row in set (0.001 sec)
Keep adding values until you have populated at least 10 rows, you can use the up arrow to bring back and edit your last statement
Examples are below
INSERT INTO transactions (description,value) values ('Pret a Manger','9.40');

INSERT INTO transactions (description,value) values ('Cancer Research UK','10.00');

INSERT INTO transactions (description,value) values ('Black Sheep Coffee','4.25');

INSERT INTO transactions (description,value) values ('Thames Water','53.24');

INSERT INTO transactions (description,value) values ('Amazon UK','32.45');

INSERT INTO transactions (description,value) values ('Transport for London','4.30');

INSERT INTO transactions (description,value) values ('ATM','100.00');

INSERT INTO transactions (description,value) values ('Boisdale of Canary Wharf','40.40');

INSERT INTO transactions (description,value) values ('O2','20.36');

INSERT INTO transactions (description,value) values ('Justgiving','101.00');

INSERT INTO transactions (description,value) values ('Mr Fox','49.00');
Once we have done this we can double check with;
MySQL >select * from transactions;
+-----------------+--------------------------+--------+
| sequence_number | description              | value  |
+-----------------+--------------------------+--------+
|               1 | Transport for London     |   6.70 |
|               2 | Pret a Manger            |   9.40 |
|               3 | Cancer Research UK       |  10.00 |
|               4 | Black Sheep Coffee       |   4.25 |
|               5 | Thames Water             |  53.24 |
|               6 | Amazon UK                |  32.45 |
|               7 | Transport for London     |   4.30 |
|               8 | ATM                      | 100.00 |
|               9 | Boisdale of Canary Wharf |  40.40 |
|              10 | O2                       |  20.36 |
|              11 | Justgiving               | 101.00 |
|              12 | Mr Fox                   |  49.00 |
+-----------------+--------------------------+--------+
12 rows in set (0.001 sec)
At this point we have done everything we need to set up the simple database, we can now write a script to query it.
Exit from the SQL interactive session using "exit".
Database Testing
Clicking the button below will test the Application Server setup.
- Testing RDS Database Connectivity
- Testing RDS Configuration
- Testing Initial RDS Data Import
Create the Python Script to Read from the RDS database
We will now use the Python "mysql.connector" library to read the transaction values from the database and present them as HTML tables on the web page.
On the application server, change to the webserver scripts directory;
cd /var/www/cgi-bin
We will now create a python script to read from the transactions in the RDS MySQL database, we will call this "mysqltransactions.py"
Before editing the script you will need;
The DNS name for the database endpoint, this should be in your scratchpad or this can be found by highlighting your database in the RDS section of the AWS console, it should look like - "intro-db-mysql.ctysq8mwiyve.eu-west-1.rds.amazonaws.com"
The password for the database, again you should have recorded this in your scratchpad
Edit the script using "sudo vi mysqltransactions.py" or "sudo nano mysqltransactions.py"
Enter the following (items in bold and brackets require you to substitute the value from the variables above), note the commas and quotes in lines 6-10. Storing passwords in scripts is not recommended for any personal data or production applications and it is recommended you look at AWS Secrets Manager for anything more advanced that a service demonstration.
#!/usr/bin/env python3

import mysql.connector

mydb = mysql.connector.connect(
  host="(enter your endpoint hostname here)",
  user="admin",
  password="(enter your database password here)",
  database="intro"
)

... (22 more lines)
Save the file
Make the file executable by entering
sudo chmod 755 mysqltransactions.py
Now you should be able to run the file by just typing "./mysqltransactions.py", you should see the output like below
<TR><TD> Transport for London </TD><TD> 6.70 </TD></TR>

<TR><TD> Pret a Manger </TD><TD> 9.40 </TD></TR>

<TR><TD> Cancer Research UK </TD><TD> 10.00 </TD></TR>

<TR><TD> Black Sheep Coffee </TD><TD> 4.25 </TD></TR>

<TR><TD> Thames Water </TD><TD> 53.24 </TD></TR>


... (17 more lines)
Finally check that the local web server is running and processing this script by running "curl http://127.0.0.1/cgi-bin/mysqltransactions.py"
Once this works we are ready to make the change to our webserver to point at this script.
Modifying the Webserver to point at the Database
For our final step in this stage we will modify the webserver to point at this database script on the application server.
Exit from the application server you are logged into, using "exit"
Now you should be able to log back in to the web server using "ssh web"
cd /var/www/html
Edit the homepage using "sudo vi index.html" (or "sudo nano index.html")
Change the script name to mysqltransactions.py as shown below, save and exit
<HTML>
        <HEAD>
                <TITLE>CLO - Internet Banking Test Site</TITLE>
        </HEAD>
        <BODY>
                <H2>Online Banking</H2>
[h3]
Transactions March 2025[/h3]

                <TABLE BORDER=2 CELLSPACING=5 CELLPADDING=5>
                        <TR>
                                <TD>Transaction Name</TD><TD>Amount</TD></TR>
                                <!--#exec cmd="curl http://10.0.16.10/cgi-bin/mysqltransactions.py" -->
                </TABLE>
        </BODY>
</HTML>
]
Now in your desktop web browser, revisit the website for the webserver instance, remember this will be "http://(your webserver IP address)", not https
You should the page is now updated with the values you added to the database, and the final line of the table shows the transactions were generated from an RDS MySQL database.
If you want to experiment, you can now log into the application server and use the SQL commands to add new name value pairs to add to your transaction list.